I´ll use this post to describe some of the difficulties I´m encountering with balancing some of the scenarios in the context of the campaign game. It´s meant to gather some of my thoughts on the problems of balancing and to look for a solution to the problem. It´s basically writing down and systematizing my thougts on the matter of scenario design with a formalised campaign-system in the background.
Using a campaign system as background makes things both easier and more troublesome at the same time - considering different aspects of the game.
On the one hand, the campaign provides you with input for your scenarios. Force-composition is dependent on the units present and the insurgency-cells located in an area. Using these input variables to determine the number of units according to the balance of power in a region provides a helping hand in creating a good and believable story within the context of the action on the campaign map. The Insurgents are heavily outnumbered by Coalition troops? Well, they´re obviously not going to give a fair and regular fight, so we´ll play an Ambush, or IED-clearance missions, etc.
The Coalition forces are hugely outnumbered by enemy fighters? Okay, then we´ll do a desperate defense mission with hordes of enemies attacking outposts or patrols or something.
The only question that might arise in this regard is how many troops are going to participate in the scenario. Is it a small, confined scenario or a big one? Are we going to use all available units in the area or are we unable to put every squad on the table? Apart from that, the Campaign System does most of the magic for you, nice and easy.
I used to play the encounters with standard-victory conditions inspired by the scenarios in the Operation Enduring Freedom Book. It works quite well most scenarios with "normal" conditions. Whenever the number of units is roughly equal to the cell value on the map, using those values is straightforward and works fine. Problems occur whenever you´re encountering more extreme cases - either side outnumbering the other one heavily.
In such cases, it is important to adjust the victory conditions in order to provide a somewhat balanced outcome. This is where things are really turning ugly, because balancing the scenario must both avoid positive feedback cycles (e.g. overwhelming force = easily won scenarios = more reinforcements for the winning side = more overwhelming force) but should on the other hand not disrupt the intricate elements of the campaign map and good decisions made on the strategic level. After all, I wouldn´t want to discourage one side to gather forces for such an overwhelming strike by totally ignoring the strategic effort he made to achieve a local superiority.
To achieve some progress in this regard, we´ll have to look into the connections between the Campaign map and scenarios. Aside from the terrain type (Urban, Village, Greenzone, Desert...) the most important thing determined by the map are the forces present. The Campaign rules use the ratio of Insurgency Cells (the sum of their values) to the number of Coalition Squads to determine what I termed "Force Gradient".
This number is an indicator of the overall balance of forces in an area. A simple Insurgency Cell with a Value of 1 is considered to be roughly equal to a coalition squad. This does not fully reflect the experience on the gaming-table though, as a US squad will usually squash the insurgency due to its higher TQ. But it work seems to work out well in terms of winning scenarios when using the OEF-Victory Points.
After determining the Force Gradient it is used to determine the type of mission (e.g. Assault on a Base for a very high gradient, which means heavily outnumbered coalition troops), the corresponding reinforcement-table and the guerilla starting units which can be diced out and/or tweaked according to the need of the scenario. The coalition troops present in the area are then tasked with a specific mission (or parts of them, if too many troops are present to utilize them all in the scenario - these reserves will then reduce the chance of reinforcement for the guerillas). Bringing in more troops on the Campaign map thus makes a significant difference on the type of mission & the enemy force composition. If heavily outnumbered, the Insurgent will get easier access to IEDs, while having vastly superior numbers against the coalition gives access to more fighters, more heavy support and even foreign jihadists.
The next step is the critical one about which this post is revolving: VP allocation to objectives.
This step is so important because after resolving the scenario, the VP allocation becomes the most important factor to convert the outcome of the scenario back into Campaign variables. One the one hand, it´s important who has actually won the scenario, as this faction will use a better table to convert VP into campaign resources. On the other hand, the number of VP matters, because for every VP gained you get to roll on that resource table. The dice-rolling adds some random element and adds some fluctuation to your resource influx, which increases uncertainty and forces you to play more conservatively or opens up possibilities not planned so far.
Winning scenarios gives COIN-Points to the Coalition forces, which can be spent on various assets, reinforcements or special options. For the insurgent, winning scenarios adds new cells to the forcepool, which can be brought onto the campaign map later on.
Apart from VP the rate of casualties is important. Both the Coalition forces and the Guerilla fighters will actually suffer from having casualties. Coalition squads can go understrength (or even be wiped out) if sustaining casualties, and will decrease in combat efficiency. At the moment, replenishment is automatic and free. This is offset by the fact that in most scenarios, the Insurgents get VP for killing or seriously wounding coalition solders. Furthermore, sustaining casualties from fighting will add to the War Exhaustion score of the coalition troops, which is their indicator of how close they are to loosing the campaign. If their war exhaustion reaches critical levels, they will suffer from penalties and eventually lose the campaign as popular support dwindles and the operation is aborted. This adds a strong incentive to not waste your troops!
The Taliban suffers in a different way: Losing too many groups in battle is accounted for by removing cells after a fight. If many fighters are killed in combat, cells effectively disappear on the campaign map. To win in a strategic sense as the guerilla player, it is thus important to get more cells than you lose (at least in the long term), while driving up the War Exhaustion Score.
As you might have noticed, one of the problems is that actually having a strategic layer (campaign map) makes it difficult to evaluate the scenario-outcome without accounting some stuff twice. As it is right now, coalition losses for example are a difficult topic: On the one hand, they are often counting as Victory Points for the Insurgent, increasing their strength. On the same time, they are decreasing coalition strength and driving them closer to defeat. Is counting casualties towards VP even legit then? After all, causing casualties is a strategic goal, not a tactical one...
To answer this question, I´ll have to make a short diversion to explain what my interpretation of Victory points is within the campaign-context. My take on victory point (and the way they are actually transfered back into the campaign context) is that they represent the ability of one side to exploit the results of a battle. VPs are a mixture of tactical sucess (e.g. taking positions, defending them, reaching objectives) and strategic sucess (sticking to the RoE, cause no civilian casualties, kill Coalition troops to show their weakness). In many cases, simply using tactical sucess is not enough to judge the performance of any side. Guerilla warfare is fought on a strategic level, winning local support and undermining the enemy strength. Tactical victories can contribute to this, but they do not guarantee sucess. If you look at the last mission, the Coalition troops where able to achieve their primary objective by capturing the mosque - but they did harm two civilians and lost a tremendous amount of men to the enemy who can now fully exploit this as a propaganda instrument to recruit more fighters. As reaching tactical objectives alone is often not enough in fighting an insurgency, this outcome is one of the prime examples why strategic components must be included in the VP score more often than not - otherwise it would be quite pointless to even fight the tabletop-scenarios, because most of the time a tactical victory would be achieved by the Coalition forces. And the conversion of VP to strategic assets wouldn´t be logical either. Long story short: VP = potential to exploit the outcome of a battle for strategic purposes.
I think it is thus generally okay to let the taliban benefit twice by killing soldiers - the VP component being their ability to gather local support by boasting with their sucesses against the crusaders, while the strategic component hurts the coalition forces at the same time. Furthermore, the Taliban player will also suffer from strategic losses
when wasting his forces on the tabletop. He´ll lose cells that he has to
replace with fresh ones in order to benefit from the outcome of the
scenario on the strategic scale, which evens out the situation somewhat. At the same time, VP should reward players for good decisions on the battlefield and add an element of balance to the game. As you can see, the distinction between these factors is difficult and very blurry. Though most of the time, when using forces of similar strength, it tends to work out surprisingly fine with the "default" VP.
As outlined earlier, the VP-question becomes more difficult when using more unbalanced forces. Sticking to the Assault-example above: Getting a good representation of exploitability of a success while retaining a possibility for the inferiour side to win is a little tougher.
Of course, you can try to build new VP for every scenario, but this makes balancing difficult and necessitates several test-runs for every scenario, which is what I want to minimize by sticking to some kind of guideline. The first idea to create such a thing is differentiating VP-allocation according to the superiority of one side, which is quanitified in the Force Gradient. It is what you would naturally do when building a scenario without any guideline anyway - the superior units have more ressources available and thus get less points for their objective, as it is easier for them to achieve.
For example, while I would give the Taliban VP for killing and seriously wounding American soldiers under "normal" circumstances, I would probably refrain from this procedure in our Assault-Scenario, as it is too easy to achieve this result when comparing it with the forces available. On the other hand, when the Insurgents are outnumbered, they might get more points for killing US soldiers than in a more balanced setup, as it is actually harder to achieve this goal.
It is already becoming clear that the VP-allocation should be balanced based on the chance of achieving them - a difficult goal has to be rewarded with more points than one that is easily achieved. When pitting a lot of Taliban against few Coalition soldiers, it is very likely they WILL cause some casualties and probably even kill someone - thus, they must not get the same VP-score from a KIA as if they where fighting with inferior capabilities.
In some ways, this is even consistent with my interpretation of VP as stated above: If the inferiour side is able to hold up against the superior force (achieving their objectives and preventing the enemy from achieving his) the potential to exploit their sucess is greater than achieving objectives against inferiour numbers. To stick with my Assault-example (you can probably guess what mission is next by now...): The Local populace and the potential Taliban-friendly elements will not be very supportive if they realize that despite huge numerical superiority the attack has failed to achieve any significant results, as the Coalition has pulled off the incredible feat of stopping the assault dead in its tracks. The potential to exploit such a success is smaller - even if more enemy were killed or wounded - as the disposition of forces leads the viewer to the conclusion that a much greater success should have been possible (like completely overrunning the enemy position). The other strategic aspects - apart from local perceptions of the fight and the ability to use this event for your aims - are still reflected by things like cell-loss, force-depletion and War Exhaustion.
Although these are not accounted as VP (they do not contribute to sway the Locals or Coalition High command to contribute more resources), they will impact on the campaign.
In turn, Victory points are - in contrast to one-off games - not the only measure of success in this campaign. This is the direct implication of the mechanisms explained above. Most of the time, the VP will provide a good final indicator of who has "won" the scenario, but not always. In our example, the assault could falter with heavy losses on both sides - the Coalition wins according to the VP score (they´re able to convince the High Command that more support is required and show the locals that it´s not a good idea to support the Taliban as they even fail using superior force) - but after losing a lot of personell, they´re weakened for the next campaign turn and accrue substential war exhaustion.
Furthermore, VP should be based on the ease of achieving success. I believe this is a general truth about scenario-balancing, not only within a campaign-context. It somethings easy, it will not be rewarded as highly as a difficult objective. It´s still difficult to judge what good victory conditions are for each scenario - and even more difficult if its not a forgive-and-forget situation after playing a single game, but a situation where the results influence the strategic layer. Talking about it in theory is a lot easier than actually writing down the numbers, for the reasons outlined above. But if you have some good idea on this matter, feel free to discuss it in the comments below! I´d be very pleased about some input.
Until I have found THE solution (if it exists), I´ll probably stick to trial & error and testplay all scenarios for the campaign at least once in a solo-run...
Monday, October 29, 2012
Friday, October 26, 2012
Operation Firefly - Mission 5: "The Mosque"
My friend visited me during the last few days, so we were able to play another game of our campaign, with more coming up in the next few days. As mentioned in the last campaign update the attack on El Qualeed has begun. Many insurgents are in the area and this time, the fighting was brutal and conclusive, due to another catastrophic turn of events...
-----------------------------
April 23 - 8:23.
After US Troops started their advance into El Qualeed in the early morning hours, fighting has started to bog down. The area is crowded with civilians and enemy combatants, but it is hard to determine who is friend and who is foe. Narrow alleys are turned into death traps in no-time and when reinforcements finally arrive on the spot, the enemy has already withdrawn. The further coalition troops advance, the stiffer the resistance gets. Snipers increasingly harass the Soldiers from elevated positions, trying to disrupt their advance. After one particularly devastating sniper attack on a Command-element of the Afghan National Army supporting the attack, Coalition HQ decides to launch an attack to secure the most dangerous sniper-positions.
While some positions - like the local radio tower - are taken out by Helicopters, one of the identified targets is the local mosque with its minarett towering above the city district. In order to win public support, the Command elements decide that an airstrike on the mosque is not feasable.
Instead, mechanized elements are ordered to advance towards the mosque and secure the position.
-------------------
Taliban Strength assessment:
Enemy elements in the area are mostly local militia who have gathered in large numbers to defend the capital and the mosque from the infidel invaders.
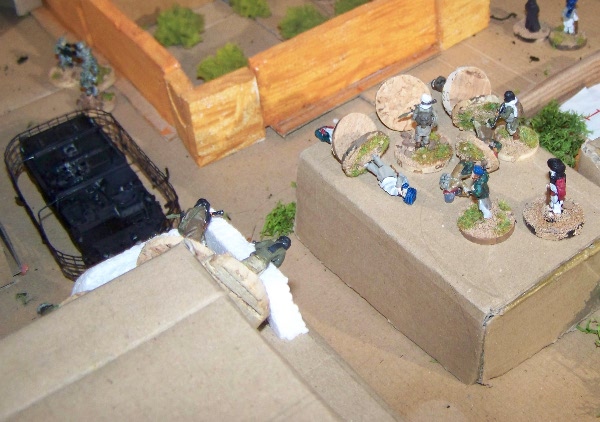
The mosque is the white building to the top left. The way is blocked by a small walled garden. A breaching test is required to destroy these walls - alternatively, troops can try to climb from the house bordering the wall onto the roof of next compound. Both actions require a sucessfull TQ check.
Turn 1
Under protection by their M1126 Stryker providing overwatch, a US Army unit (Team Blue) starts by hopping from one building to another, sucessfully spoiling an ambush by one of the two Insurgent groups visible above. Under fire by the Strykers Main Gun, the militia quickly looses its fighting strenght. During the shootout, one of the militiamen hits a US soldiers, but fortunately the body armor stops the bullet that could otherwise have been harmful.
The appropriate german proverb is "Glück im Unglück" - though you probably can´t see the numbers on the dice in the above picture, you might be able to get the result:
1,1,2,2,2,3 and 4,5 - barely blocking the incoming 5 (which was the only sucess I rolled...)
Another sucess might have already caused a casualty. So, someone was fortunate despite the misfortune of rolling badly.
Keep this roll in mind for later, you´ll probably start seeing a pattern ;)
Trying to advance into the building to their right, the second Fireteam (Red) stumbles into a vicious ambush as Taliban fighters open fire from the target towards which they are headed! Unable to react to the new menace in time, the stryker crew has to watch as two men go down. Aborting their movement, they start pouring fire into the house, supported by the Strykers HMG.
The Americans retaliation kills the majority of the Insurgent group and slowly undermines their morale.

Turn 2
After killing the majority of the group, Team Red checks their casualties. The attached Medic quickly realizes that no one is seriously wounded. One of the men is lightly wounded, but nothing some painkillers couldn´t fix - his mate is okay and ready to roll after recuperating from the shock of the unexpectedly close ambush.
At full strength again, the team decides to push the enemy out of his position by close assaulting.
After Team Red has taken the Taliban out - the militiamen where too shocked by the sight of the charging US troops to do anything and died on the spot - the GPMG-Team follows suit to establish a good overwatch-position. Unfortunately, they are heading directly into the next trap...
Knowing that this position would be crucial for the control of the battlefield - and presented with the opportunity to strike two teams at once, I activated my first Triggerman to detonate an IED in the house that was about to be occupied...
Suceeding in his ambush-roll, there was no way to shoot the triggerman before the IED struck, but I allowed my opponent to make a spotting-roll to evade the explosion, forcing him out of the building again. Only the MG-team suceeded.
The MG-crew, just entering the building, was able to spot the device that was hideously planted on the ceiling of the building. Yelling, they turn back and scramble to get out of the blast-area, while Team Red is not quick enough to react...
As you can see above, the scene caused a funny moment, as I set out to roll a devastating effect for this ingenious strike, making the attack roll in the most theatrical manner, celebrating my ingenious sucess and the availability of D8... and failing the roll spectacularly!
The blast of the IED causes confusion and panic among Team Red, but order is quickly restored - The blast spent most of its energy blasting away the roof of the house. The triggerman is finally identified as enemy and swiftly killed. But one of the team members is missing... his companions start looking for their comrade.
On the other side of the street, Team Blue, now aided by the sniper-team, are still locked in a firefight with the defenders on the roof.
Turn 3
After decimating the enemy at the roof next to them, the Special Forces sniper-team sets out to engage the remaining enemies (one of them got up after his first aid check) and jump from one roof to the other. In the resulting close-fight, a local militia leader is taken prisoner.
In the bombed building, Team Red is meanwhile struggling to find their buddy in the dust of the explosion. Only when they hear the moaning of the wounded man, muffled by the debris that buried him, they realize that he was hit by the collapsing ceiling.
After removing the debris, the medic quickly starts assessing the wounds, but it looks bad. Though alive, the man is seriously wounded and unable to continue the fight.
Just as the MG-Team starts heading back into the building, a shot cracks through the alleys, sending one of its members to the ground. The sniper has struck!
Dragging the downed man into the building, the team takes aim on the elusive sniper on the minarett and sucessfully lights up his position with a barrage of fire.

Meanwhile, the small special forces group unload from the stryker and prepares to breach the walls surrounding the orchard.
Turn 4
After three rounds of fighting, the US troops have finally suceeded in securing two good overwatch-positions and are not able to dominate the battlefield. Setting both his MG-team and the sniperteam on overwatch, the US team can now control more than two third of the battlefield...
The casualty of the sniper-fire turns of to be fine, only stumbling and hitting the ground hard as the bullet struck very close to him.
The USSF-Team fails to breach the wall after assessing that more boom is needed. One of the team members heads back to the stryker to retrieve more breaching charges.
In the meantime, the IFV advances carefully to investigate the contacts ahead, spoiling an ambush set up by a large group. Though unidentified contacts are in the Line of Fire, the stryker opens fire in violation of the Rules of Engagement.
While the stryker takes out the group on the right, the Overwatch-Sniperteam takes care of the two men in front of the vehicle. Unfortunately, both of the unknown contacts in the Line of Fire are hit (as both the Sniper team AND the stryker fail their TQ-Check.)
I know it is not allowed to fire while Civilians are in the LOF. As in all previous games, I still left the decision to the player - maybe I´ll have to add another victory condition named "Don´t violate the RoE", as my friend seems to ignore them constantly when given the choice ;-)
You´ll see that his decision turns out to be a very bad one...
While the stryker is taking care of the RPG-gunners without getting hit, Team Blue finally makes its way over the wall, backing up the sniperteam.
Turn 5
Spotting a multitude of unknown contacts (including a DShK HMG-Team in the Mosque) Team Blue and the snipers team up to clear the path to the mosque before Blue move out in order to approach the building.
Both the HMG-Team and the other enemy unit are quickly disposed off and Team Blue moves towards the gate in the orchard-wall.
Further back, Team Red is preparing to enter the next building in order to aid the fallen civilians. In another strike of misfortune, they are sucessfully engaged by a large Taliban-group behind a protective wall that prevents any Overwatch-intervention. Even after reaching the cover of the building, Team Red is too exposed to survive the barrage of fire...
Out of 7 dice, only one was sucessfull, blocking my 5. The other results where 2x1, and 4x2. 4 Hits. 4 Casualties. Team Red wiped out.
After watching the demise of their comrades, the stryker sets out to finish his job by taking out the RPG that´s still threatening its flank...
Relaxing somewhat, as the most obvious threats are dealt with, the Sniper Unit is promply engaged by another HMG-group. Barely avoiding another casualty, the Snipers return fire and kill most of the DShK-team, despite getting suppressed initially.
Turn 6
No overview-picture for this one. As you can imagine, the situation was becoming tense and taking pictures lost priority.
Leaving the orchard to reach the mosque before the end of the turn, Team Blue stumbles into the next ambush. As the sniper-team failed its PID (or reaction test? I don´t remember - they didn´t interfere) and Blue is too slow to take out the triggerman, the bomb explodes right at the entry of the mosque.
The team is hit with devastating effect - only the presence of the squad leader prevents another unit from being wiped out...
The USSF-Team swiftly moves towards their position in order to back them up, should another attack be made on them.
Team Red, still waiting for assistance, is meanwhile getting surrounded by Taliban. Though the stryker tries to engage one of the groups, it cannot aid the fallen team, being a vehicle. Dismounting driver or gunner would put them in jeopardy too, as two large groups of enemy close in...
The militiamen however chose to retreat behind the cover of the building, as they are not armed with RPGs and could not harm the vehicle.
Another large group of Taliban, moving into the building where Team Red is lying, is engaged by the US-Snipers, who manage to kill their leader. Unnerved by the loss of their commander, the insurgents take a break, but are able to initiate contact with the fallen team by finishing their declared action (As moving into contact with a wiped out team does not count as close-assault, a shaken-result should not cause an abortion of the activation. The Taliban are in cover and must thus not move towards it and the enemy unit is not combat active... Well, we had some heated debate about that, as you can imagine.)
Turn 7
Team Blue, aided by the USSF-team, is recovering from the IED-attack and sorting out the damage - only one incapacitating injury has occured, the other casualties are lightly wounded. Team Blue continues its advance into the mosque, finally securing it.
After the game, we were not sure if we had measured the distance to the mosque correctly in turn 6. It was a very close run and we decided to throw a die to resolve this conflict, and Team Blue failed. Later, my friend insisted that they should have been able to reach the mosque in the pior turn - however, as you will see, this discussion was moot because it doesn´t change the outcome of the game.
Firing at the Taliban group that has captured Team Red, the Stryker hits one of his own but fails to prevent the Militia from retreating (as they passed their TQ-check). By getting out of the building they´re also leaving the LOS of the Sniper team,
Furthermore, it was getting late and our concentration faded, which might explain some of the inconsistencies that I have discovered just now, by writing the report. I somehow suspect that we played another turn somewhere without even realizing it. Otherwise I couldn´t explain how the large group of 7 enemies at the street at the white compound compare to the 4 casualties lying around in the picture below. Or how it was possible for one irregular unit to move and shoot into a building and shoot in the same turn (see two pictures below). Furthermore, having just received a serious wound, Team Blue wasn´t able to move for one turn. All this is strange and indicates that we somehow played another turn without even realizing... Or am I just mixing up the pictures..?
In a frenzied rush, the USSF scramble to help the abducted team, cutting through any resistance like a warm knife through butter:
Turn 8/9/ whatever...
I´m lost in the dynamic events of my own scenario.
The mosque is secured, but the rush for the POWs is still on!
The Taliban try to react by moving the POWs off board...
The activation check is made - and it is sucessfull!
A reaction test is made...
...
and the Taliban win, moving another group of POWs off the board!
We made a final check for the wiped-out MG-team, of which one member was KIA. I´ll come back to it in the post-game discussion.
-----------------------------
- 4 VP for untreated Civilian Casualties on the Battlefield
Taliban Objectives:
-Hold the mosque! (5)
-Per enemy SF-member killed (5)
1x -per enemy KIA (3)
4x-per enemy POW (5)
1x-per enemy seriously wounded (2)
= Major Taliban Victory
As I indicated earlier in the report, the game resulted in quite some discussion, both about potentially reaching the mosque in turn 6 and the victory conditions of the Taliban.
Even if I count the points for taking the mosque early (+5) we´re still reaching a score of just 6 VP for the US, while the Taliban has over 20 for the captured team alone.
Suffering a KIA in the last turn of the battle is unfortunate, but bad luck - and even adding this would make the result a Major Taliban victory.
We had some argument about the VP-distribution of this scenario, but I think it is the ideal representation of what you can do with victory conditions: The US has achieved a major tactical victory by taking the mosque and causing many casualties among the militiaman, but strategically they´ve been defeated in the most staggering manner: A whole team lost, two civilians killed and even some more americans wounded or dead.
I have to agree though, that the victory conditions for future scenarios might have to be tweaked somewhat, as we are not playing this one-off. Casualties do affect the campaign outcome by raising war exhaustion and degrading the capabilities of US Squads on the campaign map. Contrary to my belief that drawing inspiration from the OEF scenario book is the best way to go, I was finally convinced that these conditions might favour the Taliban a bit too much in some scenarios.
On the other hand, I´m still not quite sure how much this is true for this particular scenario - after all, if you assume that Team Red was not wiped out, the Taliban VP-score shrinks dramatically to a mere 7 points (assuming that Team red would have rolled the same first Aid-check). Without risking the MG-team in an unnessecary act of despair, the last KIA could have been avoided as well, which would water the score down to 10 (or 15 if allocating points to the disputed quicker mosque-capture) to 5. A strategic US victory wasn´t that far away for this scenario. For some other future scenarios, a careful analysis of the VP-allocation is certainly required, but I´m still of the opinion that this scenario was fine in this regard.
-----------------------------
April 23 - 8:23.
After US Troops started their advance into El Qualeed in the early morning hours, fighting has started to bog down. The area is crowded with civilians and enemy combatants, but it is hard to determine who is friend and who is foe. Narrow alleys are turned into death traps in no-time and when reinforcements finally arrive on the spot, the enemy has already withdrawn. The further coalition troops advance, the stiffer the resistance gets. Snipers increasingly harass the Soldiers from elevated positions, trying to disrupt their advance. After one particularly devastating sniper attack on a Command-element of the Afghan National Army supporting the attack, Coalition HQ decides to launch an attack to secure the most dangerous sniper-positions.
While some positions - like the local radio tower - are taken out by Helicopters, one of the identified targets is the local mosque with its minarett towering above the city district. In order to win public support, the Command elements decide that an airstrike on the mosque is not feasable.
Instead, mechanized elements are ordered to advance towards the mosque and secure the position.
-------------------
US Objectives:
-Take the Mosque before the end of Turn 8
-Take the Mosque before the end of Turn 6
-Suffer no KIA
Your Forces:
1x US Infantry Squad
- 1x Medic attached
1x US GPMG Team
1x Special Forces team divided into:
- 1x Special Forces Fireteam (1 AR + 2x Lt. Supp.)
- 1x Special Forces Sniper Team
Taliban Strength assessment:
Enemy elements in the area are mostly local militia who have gathered in large numbers to defend the capital and the mosque from the infidel invaders.
 |
| US elements enter the district - a multitude of unknown contacts lies ahead |
The mosque is the white building to the top left. The way is blocked by a small walled garden. A breaching test is required to destroy these walls - alternatively, troops can try to climb from the house bordering the wall onto the roof of next compound. Both actions require a sucessfull TQ check.
Turn 1
 |
| US Fireteam spoils an ambush |
 |
| "Glück im Unglück" |
1,1,2,2,2,3 and 4,5 - barely blocking the incoming 5 (which was the only sucess I rolled...)
Another sucess might have already caused a casualty. So, someone was fortunate despite the misfortune of rolling badly.
Keep this roll in mind for later, you´ll probably start seeing a pattern ;)
 |
| Man down! |
Trying to advance into the building to their right, the second Fireteam (Red) stumbles into a vicious ambush as Taliban fighters open fire from the target towards which they are headed! Unable to react to the new menace in time, the stryker crew has to watch as two men go down. Aborting their movement, they start pouring fire into the house, supported by the Strykers HMG.
The Americans retaliation kills the majority of the Insurgent group and slowly undermines their morale.

Turn 2
After killing the majority of the group, Team Red checks their casualties. The attached Medic quickly realizes that no one is seriously wounded. One of the men is lightly wounded, but nothing some painkillers couldn´t fix - his mate is okay and ready to roll after recuperating from the shock of the unexpectedly close ambush.
At full strength again, the team decides to push the enemy out of his position by close assaulting.
 |
| Who´s calling? |
Knowing that this position would be crucial for the control of the battlefield - and presented with the opportunity to strike two teams at once, I activated my first Triggerman to detonate an IED in the house that was about to be occupied...
Suceeding in his ambush-roll, there was no way to shoot the triggerman before the IED struck, but I allowed my opponent to make a spotting-roll to evade the explosion, forcing him out of the building again. Only the MG-team suceeded.
The MG-crew, just entering the building, was able to spot the device that was hideously planted on the ceiling of the building. Yelling, they turn back and scramble to get out of the blast-area, while Team Red is not quick enough to react...
 |
| BOOM! |
 |
| Er... seriously?! |
As you can see above, the scene caused a funny moment, as I set out to roll a devastating effect for this ingenious strike, making the attack roll in the most theatrical manner, celebrating my ingenious sucess and the availability of D8... and failing the roll spectacularly!
 |
| Guess he wasn´t calling home |
On the other side of the street, Team Blue, now aided by the sniper-team, are still locked in a firefight with the defenders on the roof.
Turn 3
 |
| Overview at the beginning of Turn 3 |
 |
| Handcuffed Militia Leader |
In the bombed building, Team Red is meanwhile struggling to find their buddy in the dust of the explosion. Only when they hear the moaning of the wounded man, muffled by the debris that buried him, they realize that he was hit by the collapsing ceiling.
After removing the debris, the medic quickly starts assessing the wounds, but it looks bad. Though alive, the man is seriously wounded and unable to continue the fight.
Just as the MG-Team starts heading back into the building, a shot cracks through the alleys, sending one of its members to the ground. The sniper has struck!
 |
| Sniper! |
Dragging the downed man into the building, the team takes aim on the elusive sniper on the minarett and sucessfully lights up his position with a barrage of fire.
Meanwhile, the small special forces group unload from the stryker and prepares to breach the walls surrounding the orchard.
Turn 4
 |
| US Troops have finally secured suitable overwatch-positions |
After three rounds of fighting, the US troops have finally suceeded in securing two good overwatch-positions and are not able to dominate the battlefield. Setting both his MG-team and the sniperteam on overwatch, the US team can now control more than two third of the battlefield...
The casualty of the sniper-fire turns of to be fine, only stumbling and hitting the ground hard as the bullet struck very close to him.
 |
| "Man, this wall is stronger than it looks - get some more charges!" |
The USSF-Team fails to breach the wall after assessing that more boom is needed. One of the team members heads back to the stryker to retrieve more breaching charges.
 |
| Ambush spoiled |
 |
| Two ambushes spoiled! |
While the stryker takes out the group on the right, the Overwatch-Sniperteam takes care of the two men in front of the vehicle. Unfortunately, both of the unknown contacts in the Line of Fire are hit (as both the Sniper team AND the stryker fail their TQ-Check.)
I know it is not allowed to fire while Civilians are in the LOF. As in all previous games, I still left the decision to the player - maybe I´ll have to add another victory condition named "Don´t violate the RoE", as my friend seems to ignore them constantly when given the choice ;-)
You´ll see that his decision turns out to be a very bad one...
While the stryker is taking care of the RPG-gunners without getting hit, Team Blue finally makes its way over the wall, backing up the sniperteam.
Turn 5
 |
| Halfway through... |
Spotting a multitude of unknown contacts (including a DShK HMG-Team in the Mosque) Team Blue and the snipers team up to clear the path to the mosque before Blue move out in order to approach the building.
 |
| TQ D10 Snipers on Overwatch... |
Further back, Team Red is preparing to enter the next building in order to aid the fallen civilians. In another strike of misfortune, they are sucessfully engaged by a large Taliban-group behind a protective wall that prevents any Overwatch-intervention. Even after reaching the cover of the building, Team Red is too exposed to survive the barrage of fire...
 |
| Defense Roll |
 |
| "Omega 3-2, please copy.... Omega 3-2?" |
After watching the demise of their comrades, the stryker sets out to finish his job by taking out the RPG that´s still threatening its flank...
 |
| "Confirmed Hit" |
Relaxing somewhat, as the most obvious threats are dealt with, the Sniper Unit is promply engaged by another HMG-group. Barely avoiding another casualty, the Snipers return fire and kill most of the DShK-team, despite getting suppressed initially.
 |
| "We´re pinned down!" |
Turn 6
No overview-picture for this one. As you can imagine, the situation was becoming tense and taking pictures lost priority.
Leaving the orchard to reach the mosque before the end of the turn, Team Blue stumbles into the next ambush. As the sniper-team failed its PID (or reaction test? I don´t remember - they didn´t interfere) and Blue is too slow to take out the triggerman, the bomb explodes right at the entry of the mosque.
 |
| IED! |
The USSF-Team swiftly moves towards their position in order to back them up, should another attack be made on them.
Team Red, still waiting for assistance, is meanwhile getting surrounded by Taliban. Though the stryker tries to engage one of the groups, it cannot aid the fallen team, being a vehicle. Dismounting driver or gunner would put them in jeopardy too, as two large groups of enemy close in...
 |
| Attempting to get a shot at the Taliban |
The militiamen however chose to retreat behind the cover of the building, as they are not armed with RPGs and could not harm the vehicle.
Another large group of Taliban, moving into the building where Team Red is lying, is engaged by the US-Snipers, who manage to kill their leader. Unnerved by the loss of their commander, the insurgents take a break, but are able to initiate contact with the fallen team by finishing their declared action (As moving into contact with a wiped out team does not count as close-assault, a shaken-result should not cause an abortion of the activation. The Taliban are in cover and must thus not move towards it and the enemy unit is not combat active... Well, we had some heated debate about that, as you can imagine.)
Turn 7
 |
| Overview Turn 7 |
Team Blue, aided by the USSF-team, is recovering from the IED-attack and sorting out the damage - only one incapacitating injury has occured, the other casualties are lightly wounded. Team Blue continues its advance into the mosque, finally securing it.
After the game, we were not sure if we had measured the distance to the mosque correctly in turn 6. It was a very close run and we decided to throw a die to resolve this conflict, and Team Blue failed. Later, my friend insisted that they should have been able to reach the mosque in the pior turn - however, as you will see, this discussion was moot because it doesn´t change the outcome of the game.
Firing at the Taliban group that has captured Team Red, the Stryker hits one of his own but fails to prevent the Militia from retreating (as they passed their TQ-check). By getting out of the building they´re also leaving the LOS of the Sniper team,
Furthermore, it was getting late and our concentration faded, which might explain some of the inconsistencies that I have discovered just now, by writing the report. I somehow suspect that we played another turn somewhere without even realizing it. Otherwise I couldn´t explain how the large group of 7 enemies at the street at the white compound compare to the 4 casualties lying around in the picture below. Or how it was possible for one irregular unit to move and shoot into a building and shoot in the same turn (see two pictures below). Furthermore, having just received a serious wound, Team Blue wasn´t able to move for one turn. All this is strange and indicates that we somehow played another turn without even realizing... Or am I just mixing up the pictures..?
In a frenzied rush, the USSF scramble to help the abducted team, cutting through any resistance like a warm knife through butter:
 |
| USSF clearing the way |
 |
| MG Team moving out to help the POWs... running into crossfire |
Turn 8/9/ whatever...
I´m lost in the dynamic events of my own scenario.
The mosque is secured, but the rush for the POWs is still on!
 |
| Specialforces moving into position to help their comrades... |
The Taliban try to react by moving the POWs off board...
The activation check is made - and it is sucessfull!
A reaction test is made...
...
and the Taliban win, moving another group of POWs off the board!
We made a final check for the wiped-out MG-team, of which one member was KIA. I´ll come back to it in the post-game discussion.
-----------------------------
US Objectives:
-Take the Mosque before the end of Turn 8 (5)
-Take the Mosque before the end of Turn 6 (5)
-Suffer no KIA (5)
- 4 VP for untreated Civilian Casualties on the Battlefield
Taliban Objectives:
-Hold the mosque! (5)
-Per enemy SF-member killed (5)
1x -per enemy KIA (3)
4x-per enemy POW (5)
1x-per enemy seriously wounded (2)
= Major Taliban Victory
As I indicated earlier in the report, the game resulted in quite some discussion, both about potentially reaching the mosque in turn 6 and the victory conditions of the Taliban.
Even if I count the points for taking the mosque early (+5) we´re still reaching a score of just 6 VP for the US, while the Taliban has over 20 for the captured team alone.
Suffering a KIA in the last turn of the battle is unfortunate, but bad luck - and even adding this would make the result a Major Taliban victory.
We had some argument about the VP-distribution of this scenario, but I think it is the ideal representation of what you can do with victory conditions: The US has achieved a major tactical victory by taking the mosque and causing many casualties among the militiaman, but strategically they´ve been defeated in the most staggering manner: A whole team lost, two civilians killed and even some more americans wounded or dead.
I have to agree though, that the victory conditions for future scenarios might have to be tweaked somewhat, as we are not playing this one-off. Casualties do affect the campaign outcome by raising war exhaustion and degrading the capabilities of US Squads on the campaign map. Contrary to my belief that drawing inspiration from the OEF scenario book is the best way to go, I was finally convinced that these conditions might favour the Taliban a bit too much in some scenarios.
On the other hand, I´m still not quite sure how much this is true for this particular scenario - after all, if you assume that Team Red was not wiped out, the Taliban VP-score shrinks dramatically to a mere 7 points (assuming that Team red would have rolled the same first Aid-check). Without risking the MG-team in an unnessecary act of despair, the last KIA could have been avoided as well, which would water the score down to 10 (or 15 if allocating points to the disputed quicker mosque-capture) to 5. A strategic US victory wasn´t that far away for this scenario. For some other future scenarios, a careful analysis of the VP-allocation is certainly required, but I´m still of the opinion that this scenario was fine in this regard.
Friday, October 19, 2012
Into El Qualeed - Campaign Update
Don´t remember what happened up to now? Look here: Last Campaign Turn
--------------
After securing Mul Qasr and clearing the area south of El Qualeed from enemy resistance, the US Forces prepare for their thrust into the heart of the Lagashkar Valley to take the district capital.
Intelligence reports indicate massive Taliban presence in the eastern part of the city. To overcome this threat, US High Command orders Mechanized Support to be flown in by helicopter to support the urban fighting. Furthermore, Government Experts are dispatched into the area to establish a functioning administration once the district centre is controlled by Coalition Forces.
Troops are shifted from the south and from Mul Qasr to support the Operation. Once the initial defence of the Taliban is overcome, US High Command is planning to advance into the city centre to quickly erase the remaining opposition and secure the city.
-----------------------
As you can see, the operation is moving along well for the Americans. They have essentially driven the Taliban out of Mul Qasr and almost secured half of the valley. If the operation in El Qualeed is successful, they will have the opportunity to develop the province and weaken the guerillas.
But don´t be fooled by the seemingly good performance. As you can see, the forces are beginning to stretch thinner and once the Americans have secured El Qualeed and proceed further into the province, they´ll have to divert forces from protecting their gains and supply-lines.
Furthermore, casualties are already mounting which is not good for their war-exhaustion score (Right now already at 16% after 4 played engagements). If that score reaches critical levels, support for the operation will be reduced.
They still have some COIN-Points (43) from their generous starting budget (which was 65 COIN) - the Government Experts and the Stryker cut deep into the budget - and the mortar support in the last mission didn´t help either. They´ll have to bring in more reinforcements eventually, which will cost additional points. Furthermore, building up the province with aid, government experts, buildup-teams and hunting lone Taliban cells requires more COIN to be expended in the future.
I guess the next part of the Campaign will show how well the system is balanced. Right now, both sides are moving towards tighter budgets in terms of COIN and Cells in the Forcepool. Right now I´m a little concerned that the Taliban resistance might crumble too easily. On the other hand, my concern might be an indication that I need to change the playing style towards a more asymmetric approach, which would actually testify that the system is working well by generating plausible results. - Using Guerillas like regular forces ends in desaster? Try using them in guerille warfare!
Thus, I´ll not make major changes to the system for now, but monitor the results created by the engine closely to intervene if necessary. I´m also trying to create a legible guideline for all of you who are interested in using the rules in similar campaigns.
--------------
After securing Mul Qasr and clearing the area south of El Qualeed from enemy resistance, the US Forces prepare for their thrust into the heart of the Lagashkar Valley to take the district capital.
 |
| Situation after resolving all engagements of the last turn |
Intelligence reports indicate massive Taliban presence in the eastern part of the city. To overcome this threat, US High Command orders Mechanized Support to be flown in by helicopter to support the urban fighting. Furthermore, Government Experts are dispatched into the area to establish a functioning administration once the district centre is controlled by Coalition Forces.
 |
| The offensive begins |
Troops are shifted from the south and from Mul Qasr to support the Operation. Once the initial defence of the Taliban is overcome, US High Command is planning to advance into the city centre to quickly erase the remaining opposition and secure the city.
-----------------------
As you can see, the operation is moving along well for the Americans. They have essentially driven the Taliban out of Mul Qasr and almost secured half of the valley. If the operation in El Qualeed is successful, they will have the opportunity to develop the province and weaken the guerillas.
But don´t be fooled by the seemingly good performance. As you can see, the forces are beginning to stretch thinner and once the Americans have secured El Qualeed and proceed further into the province, they´ll have to divert forces from protecting their gains and supply-lines.
Furthermore, casualties are already mounting which is not good for their war-exhaustion score (Right now already at 16% after 4 played engagements). If that score reaches critical levels, support for the operation will be reduced.
They still have some COIN-Points (43) from their generous starting budget (which was 65 COIN) - the Government Experts and the Stryker cut deep into the budget - and the mortar support in the last mission didn´t help either. They´ll have to bring in more reinforcements eventually, which will cost additional points. Furthermore, building up the province with aid, government experts, buildup-teams and hunting lone Taliban cells requires more COIN to be expended in the future.
I guess the next part of the Campaign will show how well the system is balanced. Right now, both sides are moving towards tighter budgets in terms of COIN and Cells in the Forcepool. Right now I´m a little concerned that the Taliban resistance might crumble too easily. On the other hand, my concern might be an indication that I need to change the playing style towards a more asymmetric approach, which would actually testify that the system is working well by generating plausible results. - Using Guerillas like regular forces ends in desaster? Try using them in guerille warfare!
Thus, I´ll not make major changes to the system for now, but monitor the results created by the engine closely to intervene if necessary. I´m also trying to create a legible guideline for all of you who are interested in using the rules in similar campaigns.
Wednesday, October 17, 2012
Improving my Terrain
After handing in my thesis this monday, I´ve finally some more time to continue painting, crafting and gaming without remorse. So, I´ve decided so do some more work to finish some ongoing work and improve my terrain. I´m still wargaming on a limited budget and prefer to spend money on minis rather then terrain - this is why my playing field still looks somewhat... raw and unrefined. I´m aiming to constantly add bits and pieces to improve on the looks of the area, but as I scratch-build most of the stuff, it takes some time until things start looking decent. ;) And I don´t want to waste this time by not playing.
Soo, today I´ve (almost) finished my new cornfield:
The recipe for this one is simple, but labour-intensive:
some papier-mache (or corrugated cardboard or any other base material), styropor to create a basis for the plants. The plants are made from wire (cut in short pieces) and cut paper glued on it. Add green color and that´s it. But cutting and glueing all the leaves onto the plants is very tedious.
But the field is essentially free if you don´t count the working hours and made from waste!
Next, I finished my experimental tree. After this first trial I´m not 100% happy with the result, but I´ll try another one with a slightly different approach - maybe that yields better results. Because I currently lack a decent number of trees, it will probably be used anyway.
Most expensive component here: spraying-glue. (Bought for 9€ to build more trees, normal price is around 13€, but with 400ml content I hope I can create a lot of trees, which would make it a worthwile investment)
Other components: cotton (synthetic) which I´m using for smoke and explosions, and some black primer + green spraying color.
Finally, I´ve started to improve the cardboard-buildings by giving them some structure:
This rendering is simple wall-filler (picked up for less than 2€ a pack) which is simply applied on the cardboard. As you can see, I only applied the roughwork on the house to test the result and it needs some more love to look decent. Furthermore, I hope that my skills will improve after this first test :)
It´s still certainly better than:

Isn´t it?
The new version is a little bit too white for my taste, but nothing that cannot be set right with some painting.
Next Up, as I promised it some weeks ago:
Tutorial on my Version of Multicam.
Featuring:

Soo, today I´ve (almost) finished my new cornfield:
 |
| Another Field |
some papier-mache (or corrugated cardboard or any other base material), styropor to create a basis for the plants. The plants are made from wire (cut in short pieces) and cut paper glued on it. Add green color and that´s it. But cutting and glueing all the leaves onto the plants is very tedious.
But the field is essentially free if you don´t count the working hours and made from waste!
Next, I finished my experimental tree. After this first trial I´m not 100% happy with the result, but I´ll try another one with a slightly different approach - maybe that yields better results. Because I currently lack a decent number of trees, it will probably be used anyway.
 |
| Experimental Tree |
Other components: cotton (synthetic) which I´m using for smoke and explosions, and some black primer + green spraying color.
Finally, I´ve started to improve the cardboard-buildings by giving them some structure:
 |
| Buildings are about to get treated with a BIG knife! |
 |
| Result - still a bit rough, still needs some detail-work. |
It´s still certainly better than:

Isn´t it?
The new version is a little bit too white for my taste, but nothing that cannot be set right with some painting.
Next Up, as I promised it some weeks ago:
Tutorial on my Version of Multicam.
Featuring:

Saturday, October 6, 2012
Operation Firefly - Mission 4: Combat Patrol
I don´t know if it was the relatively boring mission or other circumstances that kept him from participating with more enthusiasm.
April 21 - 17:20.
Its late afternoon in the Lagashkar Valley. The sun is still blazing on
this unusually hot spring-day. The soldiers of Alpha Platoon are already
exhausted, but their command is neither able nor willing to give them a break.
The entire day they´ve been patrolling the area on the southern side of the
river, looking for influx of Taliban into the region that might threaten
Mayasaf. Some unusual activities have been spotted and the troops have been put
on alert.
This evening, more combat patrols are about to be sent out into the
Greenzone to investigate the area and report any enemy activity back to the HQ.
One of these groups is Alpha 2, one of the Squads from Alpha-Platoon
stationed in the area. Their route has already taken them along
a farmroad through clusters small settlements and farming compounds. They´re
halfway back to base when they suddenly come under fire - it´s only light rifle
fire, cracking through the vegetation from one of the treelines, but it means
trouble. After a brief consultation with HQ, Alpha 2 is ordered to push towards
the enemy position to get a better picture of their numbers and enemy activity
in the area.
Their advance behind the treeline leads them towards a number of compounds
surrounded by fields. The enemy is probably hiding somewhere here.
"Your task is to conduct a combat patrol to assess enemy numbers and their
organisation to prepare further steps. Don´t get bogged down into heavy fighting
- and, as usual, don´t harm any civilians. Gather information and get back to
base safely!"
------------------------
Objectives:
-Suffer no KIA
-Assess enemy numbers (Points awarded for every 2 enemy units sucessfully
spotted & PIDed by your soldiers)
-Investigate and mark enemy infrastructure (Points awarded for every
Hot-Spot discovered - destruction is not necessary)
Your Forces:
1x US Infantry Squad
Additional assets requested:
1x medium mortar battery, callsign Wormtooth.
----------------------------
 |
| The Area |
As Taliban player, my task is to prevent the US Teams from advancing too far (which enables them to discover more Hot Spots) while on the other hand keeping my units hidden from him (as he will get victory points for units that are discovered). That way, I decided to play rather defensively, keeping the troops hidden as long as the US troops don´t get close to my Hot Spots [Spoiler warning - only read this if you want to know where the Hot Spots are: Hot Spot locations are at: B4, F6, C9, J8 and H11 according to the map-grid ]
Turn 1
 |
| Orders for Turn 1 |
"Maaan, its soo hot!"
"Stop whining, Jackson!"
"Heh, Welcome to hell..."
"Enough, lets get rollin´! Cpl. Fricks, your team will secure the compound to our right, while we provide cover. Let´s get some smoke on the road to protect us from potential sniper fire from further down the road. Any questions? Okay, then get to work!"
"Wormtooth, this is Alpha 2. We need a smokescreen at grid 041-302."
"Roger that, Alpha. We´re checking your coordinates."
"Load is on the way!"
"3...2...1....Splash"
 |
| Smokescreen from the Mortar Support |
Turn 2
No orders-picture for Turn 2, as it doesn´t reflect what finally happened. Team Blue move towards the white house, while Team Red asks for more smoke but fails its request. Nothing dramatic and not worth the pictures or the space ;)
Turn 3
 |
| Turn 3 - Orders |
Without the cover of smoke, Blue makes its entry into the building while red stays on overwatch. Nothing happens though, until...
"Sarge, I got something! Looks like a plastic bag or something..."
"Careful guys! I want a positive ID on that thing before anyone gets closer to it."
 |
| A strange plastic bag is deposited next to the building... |
"Jackson, give me an assessment of th...."
"Contact!"


"Sarge, that looks like a bag full of weapons. RPGs, AKs... even some old M16s."
"Well, here we go... that´s what we´re looking for!"
So that´s it for my first Hot-Spot. But at this pace, I´m very confident that I can protect the other places, as they are hidden and dispersed.
Turn 4
 |
| This was the plan - but Red is only allowed a Tactical Move when leaving Buildings! They get to the edge of the field |
After the fire died down, Team Blue was kept on the lookout while red began to advance into the courtyard.
Turn 5
 |
| Orders for Turn 5 |
Team Blue advances under the cover of smoke grenades
 |
| Team Blue conceiled by smoke |
As does Team Red.
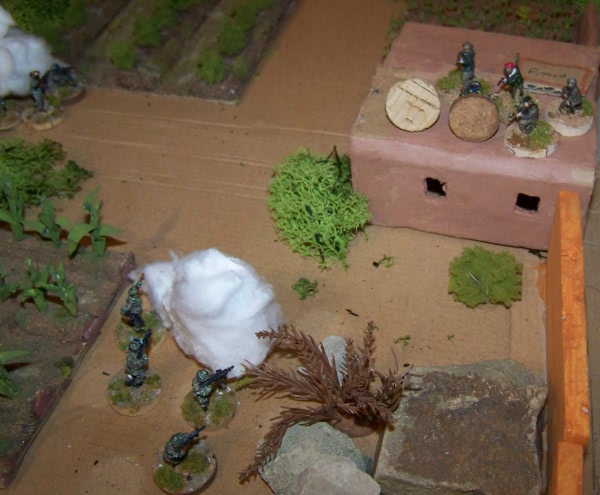
Somewhere along their path towards the house, bullets crack through the air. Someone is shooting from the compound! The soldiers quickly put some rounds into the windows before the full weight of the enemy firepower comes to bear. A young Talib with twitchy trigger-finger has spoiled the ambush his group has set up. Now, the Mujs hunker down and try not to get hit, unable to lay down effective fire on the US Soldiers that are moving closer.
 |
| Team Red detects an ambush! |
 |
| Two Taliban are killed and the rest is pinned! |
Turn 6
No orders picture for this turn, but here are the instructions:
"Blue conceals itself with smoke, while ordering the mortar to fire upon the building containing the hostile forces. The squad will then proceed to secure or destroy the weapon cache near the house.
Meanwhile, Red is put on Overwatch. Use smoke if possible."
Both Blue and Red determine that it might be wiser to save some smoke grenades for later.
 |
| Mortars are ranging in on the enemy position! |
As Blue calls in the Mortar Battery, shells begin raining on the house. The
shells strike dangerously close to the position of Team Red, filling the air
with deadly shrapnel. Fortunately, noone is hit by friendly fire, but neither
does the strike seem to have any effect on the Taliban in the building. After
watching the show, Blue moves back to the weapon cache to secure it.
 |
| Team Blue securing the bag full of weapons |
Meanwhile, Red is still locked in a firefight. Though they kill several
enemies that have resumd their attacks from the houes after the barrage ended,
the resistance is fierce. One of the US Soldiers is hit by incoming fire and the
Team decides that they are too exposed, retreating behind the nearby rocks.
 |
| Bad defense die... |
 |
| ... causing a casualty and a run for cover |
Fortunately, the wounded soldier is still combat effective, though he´ll
definitely require treatment once back at base.
 |
| "Don´t worry, it´s just a fleshwound!" |
On the upside, a casualty transport is organised, which spares the team the
long walk home.
With more time available you could continue the mission longer than
expected before retreating or abort the patrol and head to the rendevous.
"Abort mission, I repeat: abort mission. Disengage and establish a secure
perimeter until the relief arrives. Secure the weapon cache and disable it, if
necessary"
Roger that! Securing perimeter and waiting for evac.
------------
Mission Accomplished.
US
-Suffer no KIA (5 VP)
-Per Hot Spot discovered (2 VP) x1
-Per 2 Units spotted & PIDed (1 VP) x1
Total: 8 VP
Taliban
-Conceil at least 3 Hot Spots from the enemy
(5)
-Per enemy KIA (3)
-Per wounded American Soldier (2) x1
Total: 7 VP
Score: 8:7
COIN generated: 2
COIN expended: 3 (Medium Mortar)
Net COIN Loss: -1
Total COIN score: 74-1 = 73
Though the patrol was able to detect the enemy in the area, information
about their numbers and organisation remain sparse. The patrol was not able
to disrupt the enemy presence in the area in a significant way. However, the
combat experience of your troops indicates that they were up against disciplined
fighters and more resistance might flare up in the area if the enemy is left to
organise himself.
Soo - we´re back on the campaign map for the next turn! Stay tuned for the next turn!
Subscribe to:
Posts (Atom)