Showing posts with label Tutorials. Show all posts

Saturday, May 20, 2017

Painting Pestilence - The Conclusion

Hi all,

I´ve done it again, the blog has gone silent for quite a while now as I didn´t have much motivation to post here. But rejoice, it got some cool stuff finished and in the pipeline for the blog that will appear shortly.

I´m starting today to finish something I left off back in december.
Remember my attempt to record a step by step documentation on painting a Blightking?  I never posted the second part - until now.

So I dug out the photos from december and prepped them for you.
First however, the final result to wet some appetite:

Well - too bad blogger doesn´t like transparency.  He was supposed to look like this


Last time, we left off when he still looked like this:


The next step was to paint the left armor. I chose to glaze them in a light purple towards the knee and upper leg, fading into a green towards the feet.
You can see on the palette that I´m not using pure purple - I believe the base color Hexed Lichen was modified with a bit of ivory to achieve a more pastel effect. The transition was achieved with a wet blend.

Like the armor on the torso, the trick was to apply thin layers and leave the pre-shading from the priming stage shining through to create shadows and highlights.

At this stage, I also painted the belt using different shades created with cork brown as a starting point.


Next, I added edge highlighting on all the armor parts - I went with a mix of orange, tan and ivory to create the light orange edge highlight and re-used my purple and green with added parts of ivory to highlight the leg armor.

The hood was painted in a  brown, not sure if I mixed it on the palette or took something straight from the pot -  again, the edge highligh was just base color + added parts of  tan/ivory.

As you can see, at this stage the hands and straps on the armor have also been painted in. The straps are using the same colors as the hood


Next I painted the armor on the arms in Dark Sea Blue and highlighted them using the same technique as above  - no pictures though.

That left me with just the antler - they were rather tricky, I finally settled for giving them a very suble glaze of browns to create a natural look. I think I used Agrax Earthsahde here. The rotten interior was shaded with green and re-established the shadows by brushing in some very dark brown.

Towards the end I also hit the blades with some rusty orange pigments that I watered down and slapped onto the blade to create the rust effects.

Last, I painted the base in a very swampy theme like the rest of my BlightKings and mounted the mini. So, here he is:


Tuesday, December 20, 2016

Painting Pestilence - Blightking WIP

Today I have something special for you.

Throughout the last weekend I worked on painting a Games Workshop Blightking that I converted a bit to make it even more unique than the standard options allow me.
He sat in the queue for a few months after I painted the other two blightkings 

I had him primed in Black and Grey using my Airbrush, but all of the following painting procedure was done solely using a brush..

On saturday I finally started and went into full painting mood. I picked a small detail to begin - the head he carried on the armor -  and worked my way outward.


 I thought that taking pictures of my palette would give you a good impression on the colors used. Bottom to top we have:
- Dark Sea Blue (VJ MC)
- Imperial Blue (VJ GA)
- Hexed Lichen (VJ GA)
- Dark Green (VJ GA)
- Armour Green (VJ MA)
- Hull Red (VJ MA)
- Black (VJ MC)

And from the left to the right edge:
- Cork Brown (VJ MC)
- Tan Yellow (VJ MC)
- Dark Flesh (VJ MC)
- Ivory (MC)

VJ = Vallejo
MC  = Model Color
GA = Game Air
MA = Model Air

Most of the intermediate colors where created by mixing these to different degre, as we will see when the palette changes as we go along.  I´m not even sure if I touched the Dark Flesh at all.


Next you can see how I started to build up the red armor. Before I did this I put in some edge highlights in white onto the black-grey gradient, hoping it would shine through and create some depth. In the end I added another edge highlight later on, so that was a bit of a waste. 


Apart from that, it was just several thin layers of Hull Red.
After that was done, I had a nice coat of red on the armor parts.


Next time, I´ll show you how I built up on that, so stay tuned to see the mini taking shape!

I you like this format and would like to see more like this, let me know in the comments.


Wednesday, December 7, 2016

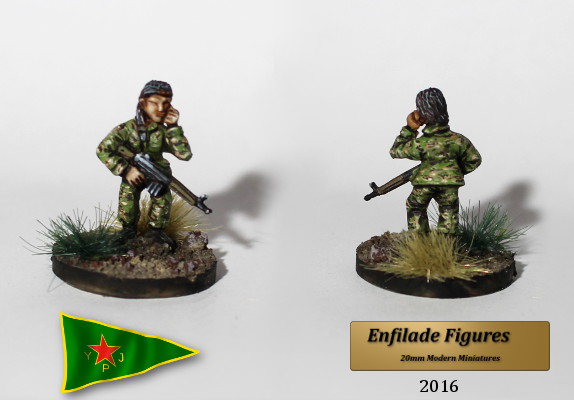
Calling Home - YPJ Female Militia Leader

Today we continue with some pics of the new Female Militia set.

On this figure I attempted to emulate MARPAT Woodland Camo and I think it turned out ok.
If you want to try it at home, the recipe can be found after the jump.

www.enfilade-figures.com/catalog/ypj-ypg 

Tuesday, November 25, 2014

DPM / Woodland - Painting Tutorial

Hey folks,

I´ve been asked to do a tutorial on my DPM / Woodland camo, so I took some photos while painting the latest mini and here we go:

The end result is supposed to look somehwat like that:


Only difference is: we´re painting an Insurgent today.

Before we start, a word of CAUTION:
The pictures where taken under my neon tube, which distorts the colors! The green is much greener than it appears in normal sunlight. So don´t worry if your results done look exactly as on the pictures!


We´re starting with priming the minis and adding a pre-shading by spraying some grey primer on top of the black one. You can probably achieve a similar result when working just on the plain primer, but I prefer it this way.


Next we start with the base color, which is  Russian Uniform Green (VJ 70.924)


If you want to apply wash or shade, now is the time. Put it on, let it dry, repaint the parts that are not supposed to be dark with russian green.

After this step, we make this a little bit greener by adding a diluted layer of Olive Green (VJ 70.967) or German Camo Bright Green (70.833) to create some depth.  Please don´t paint the highlighting color all over the mini, only on the elevated parts!


Now I add patches of Desert Yellow (71.122), which is an AirModel Color. I believe the standard model color equivalent is Iraqi sand or somesuch.

The trick here is to add the yellow patches on the elevated parts of the uniform, where the light would hit it. This way, you create the appearance of more depth which is usually lost when painting camouflage all over the figure.
The figure now looks like this -  Sorry for the blurry picture:


Next step is adding patches of German Camo Medium Brown (70.826) - preferably on the darker parts of the uniform, but you probably need to add more blobs elsewhere.


Now where getting close to the finishing line. Grab your Olive green again and highlight the edges of the uniform, the raised parts of folds in the cloth, etc. 

Then  use  German Camo Black Brown (70.822) to paint the dark pattern. Be very careful, you have to paint rather thin lines. I apply the color by using just the tip of the brush and a very low dilution (almost pure color, just a tiny tiny bit of water to improve the paintflow). 

If you look at the original pattern you´ll see that it´s usually three lines joined together in the middle.


Now re-highlight the edges again with Olive green if you´ve painted over them and maybe add a second layer of edge highlighting with a slightly lighter greentone (I mix it myself, using Olive Green and White or Ivory)

Et voila:


That´s about it. Now take care that you don´t destroy the camo again while painting the rest of the figure :D 


Good luck!

Thursday, November 1, 2012

Simplified Multicam - A Tutorial

It has taken some time, but I´ve not forgotten the request about a tutorial on how I painted my American troops. They are supposed to be wearing multicam pattern, a fascinating camouflage that adapts to the background in different terrain features.

Its a very difficult task to paint a 20mm mini with this camo, not only due to the fact that it has 6 colors but also because the pattern itself is very hard to distinguish, with small splotches all over the place. This is why I decided to simplify it a little bit, due to the fact that I´m not a distinguishes painter and have reactivated my skills in this regard only recently after leaving them idle for a while ;)
This is why my version of multicam is not the most perfect interpretation I´ve seen, but the best that I was able to paint my minis with. It´s the quick and dirty-approach, able to get your minis painted up quickly for a decent result. In my opinion, they could be a bit more greenish (whenever I see multicam I am reminded of that fact - mine look more grey than green...)

If you are looking a more advanced tutorial, try this one: http://wfarcadia.blogspot.de/2012/03/painting-multicam-tutorial.html


For this small tutorial I took some photos while painting the next batch of minis - it´s not the most perfect outcome I´ve ever achieved, but its okay and you should get the idea.

To get things set up, we need 4 colors:
-Vallejo Medium Grey
-Vallejo German Camo Bright Green (or a similar greenish tone - feel free to experiment)
-Vallejo German Camo Black Brown
-White (either Citadel Skull White or Vallejo Dead White - I guess any other white will do as well)


First, we paint the mini in Medium grey after priming it black.

Base Color: Medium Grey


Next step is to add the skin color and some blacklining to the mini to highlight the shape.
This mini will get gloves, so no skintone to the hands.

Skintone & Blacklining

Next step is to add green splotches all over the uniform:

Add German Camo Bright Green

After finishing this step, you´ll have to add  German Camo Black Brown. This is where things start to become more difficult - try to get some overlay with the green parts, but don´t overdo it.

Apply German Camo Black Brown
After this step you should repeat the green phase if you want a better looking result. Just add some more green to reduce the regularity and disrupt the shape of the black splotches. If you are not too concerned with details but just want the mini to look good from a distance, you can also leave this step. 

 Finally, to finish the camo pattern, we need some white. This is probably the most difficult step of all - you have to be very careful with applying the white dots - its best to use a very fine brush for this task. Don´t add too much white, or your pattern is ruined! My example almost has too many white dots. Try to apply them on the Black Brown parts of the uniform - but again, not exclusively on those. 

Final Uniform
 If you´ve added too much white, you can try to correct it by using the other colors and reducing the strength of the dots. They should be very tiny and almost invisible (more like on the lower parts of my example).

After you´ve finished the uniform, you can add the remaining details. As you can see, my mini still needs some greyish highlighting on the rifle and probably on the knee protector as well.

 To give it the final touch and improve the look of the mini in a significant manner, you should simply paint the basing material, e.g. sands & stones in the appropriate uniform colors. Adding some areas of medium grey, black brown and small white grains on the base makes a tremendous improvement on the impression of the mini! I´ll show you the effect on my Machinegun-Team, as they have a bigger base and are thus better suited for demonstration purposes: 

Coloring the Bases

I hope you can see that they blend into the background much better after adding similar colors to the base. This actually makes the pattern stand out less, which improves the overall look.
However, I still believe it´s too much grey and not enough green... maybe I´ll have to experiment some more.

I hope this gives you a good impression on how I´ve done this and enables you to replicate my approach. It´s a quick and easy way to paint the pattern, but certainly not a perfect one. But thats the price of keeping it simple ;)

One final picture to show you how well the guys blend into terrain:


Source: multicampattern.com

:D

 If you have any questions, just ask!