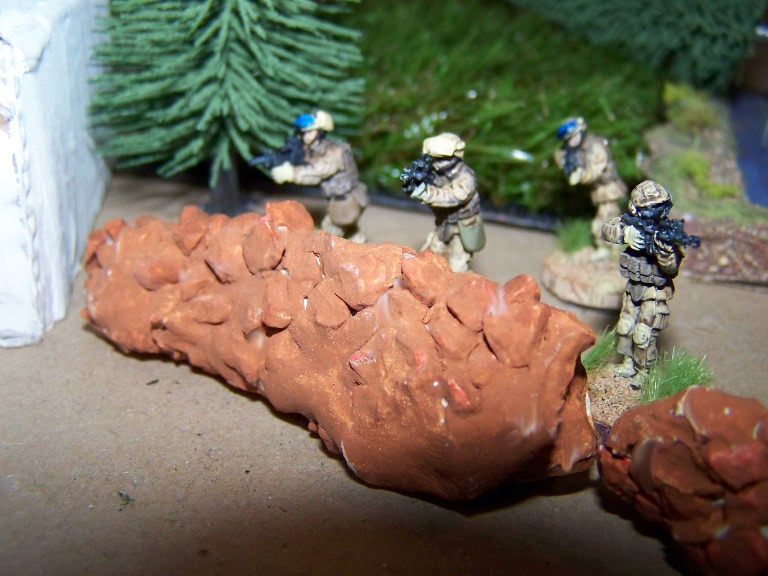
Hello folks and welcome to the next battlereport as promised. This is the second game we played on Saturday and the setting is again Afghanistan.
I threw together two lists from previous scenarios that we hadn´t pitted against each other in this combination, so we saw the USMC facing a horde of Local, irregular Taliban.
After setting up the table and rolling off the starting edges it became pretty obvious that the terrain favoured the Taliban to some degree.
The USMC had to secure and hold the compound, the Taliban just had to kill the Infidels.
As you can see, the USMC also screwed up the initial deployment somewhat by committing a whole squad to the central compound, which severely limited their movement options. The second squad was positioned much better on the right flank, covered by a treeline and with a good look over onto the rocky hills.
The approaches to the compound where littered with suspect devices which pretty much blocked the USMCs way on any direct route into their objective.
Due to the restricted approaches the Taliban where able to secure some key positions, including the compound in the first two turns which made it even harder for the americans to achieve their objectives. Instead they switched into the patience-mode and started picking off the Insurgents at range, killing Taliban at a steady rate.
The only problem was that Taliban where getting reinforcements and could compensate this to some degree as long as key personell (leaders) were still alive.
The US couldn´t reinforce their troops and any losses would bring them one step closer to defeat. Unfortunately, the first KIA on the american side occured in the early part of the game, one of the first firefights on the right flank took down a Marine for good.
To put up more pressure, the USMC sent a Fireteam forward on the right flank to occupy the hillside under cover from the rest of the squad and called in their Cobra Gunship to deliver a strafing run on top of a bunched up group of Taliban.
Unfortunately for the Marines the Taliban were not pinned down and able to move out of the way before the ordnance hit, so the strike was actually very ineffective but at least drove the Insurgents closer to the US.
Meanwhile the Taliban had turned up with a new shiny toy, a DShK-HMG that was being set up in a field before delivering a volley of 12,7mm fire into the house occupied by US Forces. Though no casualties were caused, the Team and the JTAC where easily pinned.
To counter the threat, the Cobra was again dialed to deliver a missile into the HMG-team and the nearby cell of fighters. Unfortunately clearance procedures and a bad attack vector of th helicopter after the last strafing run delayed the request significantly and would leave the US in contact for quite a few more turns.
So instead of being stuck in the compound the Marine commander decided to relocate one of the fireteams towards the right flank to reinforce the push onto the hill.
Meanwhile the firefight on the hill and the right side in general was raging on, with one single fireteam pitted against three groups of insurgents in a firefight on close range. In a heroic stand they held out for the entire game and reduced the Taliban groups one by one - fortunately the leadership on the right flank was somewhat weakened by the loss of a leader early on, so the Taliban couldn´t fight with full efficiency as the Irregulars wouldn´t always perform as expected.
On the picture above you can see a second US casualty occuring, shot from the far end of the compound. He was ultimately found seriously wounded and quickly tended to by the Medic.
Meanwhile, the firefight on the hill raged on, with a steady rate of Taliban casualties. Fortunately the Taliban weren´t able to mount a combined effort on the USMC team, both due to command and control issues and overwatch from the rest of the squad in the treeline.
The Taliban now moved another small cell into the compound to establish line of sight to the isolated fireteam, but again they were unable to cause casualties or suppress them for good to prepare a close assault by the remaining troops.
Another HMG-team turned up and was positioned on the right flank as well, ready to deliver some hefty firepower on the lone Fireteam.
Fortunately, the Taliban made a mistake by drawing in another leader from the left flank to prepare the ultimate destruction of the fireteam. Putting the leader in the direct line of fire of the USMC-team (and without much cover on the wall of the compound) proved to be fatal as the Marines took him down before he could coordinate anything.
At this point, the Taliban command was seriously strained, with only three leaders left they where running short on activations for all their units.
Furthermore, time was running out as the Taliban player had to leave and my departure was also drawing closer. We thus called it a game, and though it was a very balanced affair to this point my bets would have been with the Marines. On the other hand.. you never know, a few bad rolls and the Taliban might have succeded as well... hard to say
All in all, a very nice game. The Marines paid for their mistake to deploy into the compound, which essentially boxed them in. They also suffered from the IEDs blocking their way (or rather from our hesitation to put the men at risk by taking that route).
Showing posts with label USMC. Show all posts
Tuesday, November 18, 2014
Thursday, May 15, 2014
The Canal - Another FIMP Playtest (1)
Hello and welcome to another playtest report for our Force on Force Improvement Project.
I´m writing this up as I play along solo, hope it doesn´t take me too long, but it should provide a good log of activities and a nice overview of the rules. This is an internal test for version 0.47 to make sure it works before I distribute it to the other "closed beta" testers - but it really isn´t as closed as you might think, just message me if you want to take part ;)
This Scenario is a first test for the scenario design tools I´m working on, so don´t expect it to be too balanced yet. I hope it´s not a complete walkover though, otherwise I´ll have to seriously rebuild things.
Forces
We are pitting two Squads of USMC (TQ D8 Morale D10) against a mixed force of regular fighters (D6/D10) and local Insurgents /also D6/D10) somewhere in Afghanistan.
USMC Task Force:
-2x USMC Squads comprised of 3x Fireteam (4 soldiers incl. 2 Supp. Weapon, body armor) and a Squadleader each (Leader)
-1x USMC GPMG Team with M240 (Weapon Team), attached to the formation and commanded by the squad leaders.
USMC is subject to Western Medevac rules and loses VP if they suffer KIA.
So the USMC formation is tough, filled with manpower and maybe a little short on command ressources, but they have an initiative level of D10 which might compensate the lack of dice a little bit.
Taliban Forces:
-4xAK + Leader + RPG (regulars)
-3x AK + PKM (regulars)
-3x AK + Leader (irregulars)
-2x AK + RPG (irregulars)
-2x AK + RPK (irregulars)
-Leader
-1x Light IED (AP: 2/AT: 1L )
Starting Insurgency Level : 2
Caveman Casevac
The Taliban draw two "Ambush"-Cards, which are aces up their sleeves. The first card says "Place reinforcements in any field on the southern board half", the second is a "place reinforcements in any building/behind any wall in the northern board half" - please note that these can only placed outside enemy optimum range to avoid exploits with units popping up in controlled areas.
Objectives
USMC Objectives:
-Take the Bridge over the Canal (5 VP)
Taliban Objectives:
-Hold the Canal and the Bridge (5 VP)
-per US KIA: 2 VP
There is no explicit time limit, but with variable insurgency level, the Taliban benefit from more reinforcements the longer the clock keeps ticking, increasing their chance to bring a world of hurt onto the Americans.
The Game - Turn 1
After setting up, the game starts with some Initiative rolls. The first roll already produces a tie, with 3 successes for each side. Having the higher base initiative dice, the Americans go first this turn.
They set their MG team on Overwatch and advance on the right flank into the fields covering the approach to the Canal. Being covered by Overwatch, the Taliban decide not to act and wait for a better opportunity. Instead, they reorganise the troops on the far side of the Canal to bring them closer to the action. With one unit refusing to obey, they lose a precious die and choose to only move on unit using Out of Contact Movement. With one die left, they can only activate a unit within command range, which are exactly the units they don´t want to move right now... So they choose to not use the die.
Turn 2
With 3 successes versus 2, the Taliban wrest Initiative from the Americans hands and are ready to unleash hell on the poor Marines...
Their Reinforcement roll yields a 2, which is just enough to bring more reinforcements on the table. They roll a 3 on the Reinforcement Table, which means 1D6 AK - and they get a whopping 5 Taliban Regulars onto the Table! Next turn, Reinforcement level will be 1.
With three command dice available, they choose to execute their "Ambush"-Card, placing the reinforcements straight into the southern field by the road!
They move the nearby leader towards the new unit, which is just two inches out of effective ambush range, so preemptive discovery doesn´t matter. The leader barks at them to open fire and they send a volley down the range, targeting the American Fireteam in the open.
Though the Americans win their Reaction Test 8-5, they score only a single success, cause no casualties and fail to suppress the Taliban. Thus, they are targeted by pretty accurate fire from the Insurgents. A Marine is hit, the Team decides to fall back into better cover.
The large Taliban group on the hilltop attempts to join the fray by firing on the USMC Team that has taken cover on the right flank last turn, forming up in a field and treeline. The Americans spot the incoming rounds in time and are able to return fire with some effect. Four successes in the round of fire send the Taliban cowering behind their rocks, while causing no casualties.
Without fire superiority on the team in the fields, the Taliban move their Irregulars into a position to cover the flanks of their reinforcements in the southern field.
With their remaining Activations, the Americans fire on the Taliban in the field in order to fix them in position. Winning their test and scoring 5 successes, they are able to cause two casualties on the Talibs and suppress them. With the unit fixed, they go on to the flanking part, sending another team wheeling around the right flank...
The position is not optimal, but gives good cover against the Local Irregulars across the Canal, even if it doesn´t allow flanking fire on the Taliban in the field. The Americans open fire on the Irregulars to force them to the ground. Being Irregulars that moved this turn, the Locals are no match for the Americans. The US Marines hit one of them, but fail to suppress the unit.
Turn 3
US Command has trouble to sort out the situation, rolling only a single success and being completely outmatched by the 4 Taliban command successes. Fortunately, the Taliban don´t have many units in condition to act.
All Taliban Casualties are found dead, the wounded US Marine is lucky and has suffered nothing but a light wound.
No Reinforcements will arrive this turn, as was to be expected. Next turn, Reinforcement Level is back to 2.
The Taliban choose to activate their Irregulars to shoot on the US Team on the wall, but fail their reaction test with a 1 - which means time for a Fog of War Card!
They draw a Card named "Where did that come from?!" - allowing them to fire first in a round of fire of their choice, even pre-empting Overwatch fire. They gladly keep the card to exploit it later, not willing to waste it on the small Irregular cell.
The Americans hit another irregular and pin the cell down, preventing any further firing from the Irregular unit.
Aggrevated by his enemies success, the Taliban player (me) attempts to draw in another regular cell to fix the problem, but they outright refuse to listen to the leader that detached himself from the team earlier. Down to two dice, the Taliban leaders try to radio a team further behind the frontline, without success. Four command dice wasted without much effect!
With their single command dice, the Americans activate another fireteam in the back, firing on the unit in the field to keep it suppressed and then disengaging to support the attack on the right flank. Usually I would have started a close assault on the unit in the field at that point, but the IED placed right in the middle of the road deterred me.
Turn 4
The Taliban sacrifice one of their command dice to unpin their large cell on the hillside and roll 3 successes with their remaining 5 dice. The Americans also score 3 successes, resulting in a draw. So the Taliban retain initiative from last turn.
The Local Taliban casualty (irregular) is found dead, the wounded man in the field is up on his feet again, probably thanks to smoking a lot of Opium before the battle started.
Reinforcement Roll is a 5, so no additional troops and next turn the level increases to 3.
The Taliban use their initiative by attacking the Fireteam on the wall with the group on the hill, which is devastating flanking fire. They execute the Fog of War Card just to make sure they go first and push some 8 FP dice into the American team, scoring 4 successes. The Americans are exposed (flanking fire) and do not benefit from the wall facing the other way. Their saving roll is merely a 6+
In a display of good fortune, they roll two 8, one 7 and only a single 3, suffering just a single casualty. They are pinned and fall back into the nearby field, but their return fire has the Talibs putting their heads down again.
Again, they try to activate the defiant team inside the Canal, but as before they refuse to obey. With only one die left and all units within command range either activated or pinned, the Talibs lose their last command die.
The US-Player (again me - nice thing about solo gaming xD) puts some ineffective fire down range by their MG team while maneuvering two teams along the left and right flank. Progress is still slow due to the dense terrain.
Turn 5
Taliban spend another command initiative die to unpin the unit on the hilltop and a second to unpin their team in the field. With 4D6 they score two successed and again keep the initiative against a bad USMC roll with two successes.
The casualty of the flanked US Fireteam is again just lightly wounded, this seems to be a lucky day for the Americans.
Reinforcement roll is another 5, which means no more manpower for the insurgents this turn, but better chances next turn.
The Taliban leader with the irregulars by the canal detaches himself to run towards the compound, trying to get back into command range to avoid further loss of command dice.
They shoot on the MG team and force it back into the underbrush, but without any casualties. More fire pours down from the hill, targeting the pinned Marines in the fields on the right side of the road, but to no effect.
The US Teams now use their two command dice to move up two teams on the left and right flank.
Turn 6
Both teams are out of luck with their iniative rolls, only one success per side. The Taliban had spent another two dice to unpin their teams on the front line.
Reinforcement roll is a 4, which actually means reinforcements are arriving! The Taliban roll a 9 on their table, so 2D3 Ak + Leader + RPG. They roll 3xAk, so the team is five man strong again. The troops arrive at Hotspot number 1 - which is on top of the hill, where a huge blob of Insurgents now resides. America should have brought heavy calibres... I knew that taking the GPMG team to battle was a mistake, should have chosen the mortar salvos...
The large Taliban cell tries to keep up fire on the MG team, but again roll a 1 on their reaction - another Fog of War Card! "Playing Dead" - One unit that has been fired upon this turn may automatically go into hiding and has to be spotted again. Nice opportunities for some ambushes, maybe.
The US MG fire (still pinned and with reduced accuracy) is remarkably effective, taking two Talibs down - including the RPG gunner - and pinning the unit, preventing any effective return fire from these badly trained troops.
The Marines push on the right flank, closing with the Canal and trying to eradicate the last Irregular insurgent on the other side of the obstacle. With poor shooting on both sides, nothing happens.
Turn 7
Finally some good dice on the American command roll. 3 Successes. Unfortunately the Taliban now have another leader on the table, which takes them to 8 base initiative dice. Though they spent one to unpin a unit, they still roll the required three dice to keep the initiative.
First Aid on the Taliban at the hill (if you want to call it that way) looks grim, both are dead or dying. Nobody is trained to take over the RPG, so it´s left in the dust.
Reinforcement roll is a 3, which means MOAR TROOPS - Again it´s a 9 on the table, just as before. This time it´s 4xAK + Leader + RPG arriving at Hotspot number 3, on the far right corner of the board.
The reinforcements from last turn suffer badly when they try to engage a USMC fireteam. Two casualties including the leader and a demoralized unit are the result of the feeble attempt.
The cell in the field attempts to finish what the others failed to bring to a conclusion, but are interrupted by another US Fireteam. Losing both reaction tests, they are subject to the combined fire of two teams and are remarkably resilient, suffering just a single casualty and no morale effects, while dishing out a pinned result to one of the US teams.
Knowing it won´t get easier with time passing, the US forces are ordered onto the offensive. The right flank advances further towards the Canal with a second fireteam joining the push, the team on the left relocates to the edge of the woods to open fire on the Taliban on the hilltop.
Turn 8
Taliban Initiative suffers from the two dead leaders, but they still score 3 successes consistently and outmatch the Americans with two successes.
No Reinforcements this turn, but next turn the level is back to three. The Taliban leaders are beyond rescue and now the left flank could start to crumble. Fortunately, the Americans have to relocate their command elements to keep pushing forward.
The Taliban use out of contact movement to draw their reserve cell closer to the action and bring a leader back into command range of the units on the hill. They activate one of those to shoot on more Americans in the open, but are again preempted and devasted - the same unit as before. Losing three men and getting suppressed, the party is probably over for them.
At the Canal, the Taliban reinforcements are moving into close firefighting range with the Americans to prevent any further advances onto the objective. With both teams rolling a 1, it´s Fog of War Time again! The Taliban draw a free reroll of their reaction test (which they have won anyway, having the initiative), while the Americans hit the Jackpot: "Just a fleshwound" - The next serious wound is automatically downgraded to a light wound.
This seriously hampers the Taliban who need the serious wounds desperately!
The firefight erupts, after a few seconds an American is hit and his companions are heading for cover behind them. Their return fire hits a single Talib, but no on of importance.
The US player suppresses the Taliban on the hill with more fire from the Machinegun and the nearby infantry team before starting a mad dash across the open field, in a gamble to increase pressure on the enemy.
Turn 9
Finally scoring more successes than the Taliban, the US Marines achieve initiative for the turn (3 successes vs. 2) and the gamble might pay off.
All Taliban casualties from last turn are dead, the wounded US Marine has rolled a critical wound, but is downgraded to light thanks to the Fog of War Card.
Reinforcements do appear to bring the Taliban back on track (2 rolled) - 1D6+2 Insurgents with AK. A total of 5, again reinforcing hotspot 1 on the hill.
The Americans open fire on the cell in the field, suppressing them and whittling down their strength to two men. Setting their team on the far left on Overwatch to cover the hill, they attempt to initiate close assault...
Rolling a 7 the Americans charge forward, quickly dispatching the Taliban with grenades and controlled bursts.
The Taliban by the Canal turn to confront the Americans inside the field, but the short range firefight has them suppressed and suffering a casualty.
Turn 10
In a rare occurance, both teams roll all their dice successfully, producing 4 vs. 4 dice. The Taliban are suffering from the loss of their leaders...
Reinforcements are not in sight.
The US Marines on the left act on their own initiative and shoot at the large team on the hill - however, the Taliban draws a lucky Fog of War Card that auto-wins the reaction test for him, going first. With 8 FP rolling downhill, the Marines suffer a casualty and are utterly suppressed.
So the US retaliates in true fashion by bringing down more firepower and killing another Taliban, pinning the rest.
Inside the fields, the US Marines refuse to push deeper into the unknown to close assault the other cell, fearing an ambush. The Taliban are meanwhile attempting to outmaneuver them by bringing units around their left flank in the fields and along the hill. Fortunately they are able to spot the threat in time, silence the immediate threat and reposition to face further calamities.
At the end of Turn 10, the Objective is still contested, American forces have been lucky and their casualties light. So far, the scenario seems to be very balanced, which is good news for the scenario balancer. I´ll take a break here and get back to the game later - maybe with some human opposition?
I´m writing this up as I play along solo, hope it doesn´t take me too long, but it should provide a good log of activities and a nice overview of the rules. This is an internal test for version 0.47 to make sure it works before I distribute it to the other "closed beta" testers - but it really isn´t as closed as you might think, just message me if you want to take part ;)
This Scenario is a first test for the scenario design tools I´m working on, so don´t expect it to be too balanced yet. I hope it´s not a complete walkover though, otherwise I´ll have to seriously rebuild things.
Forces
We are pitting two Squads of USMC (TQ D8 Morale D10) against a mixed force of regular fighters (D6/D10) and local Insurgents /also D6/D10) somewhere in Afghanistan.
USMC Task Force:
-2x USMC Squads comprised of 3x Fireteam (4 soldiers incl. 2 Supp. Weapon, body armor) and a Squadleader each (Leader)
-1x USMC GPMG Team with M240 (Weapon Team), attached to the formation and commanded by the squad leaders.
USMC is subject to Western Medevac rules and loses VP if they suffer KIA.
So the USMC formation is tough, filled with manpower and maybe a little short on command ressources, but they have an initiative level of D10 which might compensate the lack of dice a little bit.
Taliban Forces:
-4xAK + Leader + RPG (regulars)
-3x AK + PKM (regulars)
-3x AK + Leader (irregulars)
-2x AK + RPG (irregulars)
-2x AK + RPK (irregulars)
-Leader
-1x Light IED (AP: 2/AT: 1L )
Starting Insurgency Level : 2
Caveman Casevac
The Taliban draw two "Ambush"-Cards, which are aces up their sleeves. The first card says "Place reinforcements in any field on the southern board half", the second is a "place reinforcements in any building/behind any wall in the northern board half" - please note that these can only placed outside enemy optimum range to avoid exploits with units popping up in controlled areas.
Objectives
USMC Objectives:
-Take the Bridge over the Canal (5 VP)
Taliban Objectives:
-Hold the Canal and the Bridge (5 VP)
-per US KIA: 2 VP
There is no explicit time limit, but with variable insurgency level, the Taliban benefit from more reinforcements the longer the clock keeps ticking, increasing their chance to bring a world of hurt onto the Americans.
The Game - Turn 1
After setting up, the game starts with some Initiative rolls. The first roll already produces a tie, with 3 successes for each side. Having the higher base initiative dice, the Americans go first this turn.
They set their MG team on Overwatch and advance on the right flank into the fields covering the approach to the Canal. Being covered by Overwatch, the Taliban decide not to act and wait for a better opportunity. Instead, they reorganise the troops on the far side of the Canal to bring them closer to the action. With one unit refusing to obey, they lose a precious die and choose to only move on unit using Out of Contact Movement. With one die left, they can only activate a unit within command range, which are exactly the units they don´t want to move right now... So they choose to not use the die.
Turn 2
With 3 successes versus 2, the Taliban wrest Initiative from the Americans hands and are ready to unleash hell on the poor Marines...
Their Reinforcement roll yields a 2, which is just enough to bring more reinforcements on the table. They roll a 3 on the Reinforcement Table, which means 1D6 AK - and they get a whopping 5 Taliban Regulars onto the Table! Next turn, Reinforcement level will be 1.
With three command dice available, they choose to execute their "Ambush"-Card, placing the reinforcements straight into the southern field by the road!
They move the nearby leader towards the new unit, which is just two inches out of effective ambush range, so preemptive discovery doesn´t matter. The leader barks at them to open fire and they send a volley down the range, targeting the American Fireteam in the open.
Though the Americans win their Reaction Test 8-5, they score only a single success, cause no casualties and fail to suppress the Taliban. Thus, they are targeted by pretty accurate fire from the Insurgents. A Marine is hit, the Team decides to fall back into better cover.
The large Taliban group on the hilltop attempts to join the fray by firing on the USMC Team that has taken cover on the right flank last turn, forming up in a field and treeline. The Americans spot the incoming rounds in time and are able to return fire with some effect. Four successes in the round of fire send the Taliban cowering behind their rocks, while causing no casualties.
Without fire superiority on the team in the fields, the Taliban move their Irregulars into a position to cover the flanks of their reinforcements in the southern field.
With their remaining Activations, the Americans fire on the Taliban in the field in order to fix them in position. Winning their test and scoring 5 successes, they are able to cause two casualties on the Talibs and suppress them. With the unit fixed, they go on to the flanking part, sending another team wheeling around the right flank...
The position is not optimal, but gives good cover against the Local Irregulars across the Canal, even if it doesn´t allow flanking fire on the Taliban in the field. The Americans open fire on the Irregulars to force them to the ground. Being Irregulars that moved this turn, the Locals are no match for the Americans. The US Marines hit one of them, but fail to suppress the unit.
Turn 3
US Command has trouble to sort out the situation, rolling only a single success and being completely outmatched by the 4 Taliban command successes. Fortunately, the Taliban don´t have many units in condition to act.
All Taliban Casualties are found dead, the wounded US Marine is lucky and has suffered nothing but a light wound.
No Reinforcements will arrive this turn, as was to be expected. Next turn, Reinforcement Level is back to 2.
The Taliban choose to activate their Irregulars to shoot on the US Team on the wall, but fail their reaction test with a 1 - which means time for a Fog of War Card!
They draw a Card named "Where did that come from?!" - allowing them to fire first in a round of fire of their choice, even pre-empting Overwatch fire. They gladly keep the card to exploit it later, not willing to waste it on the small Irregular cell.
The Americans hit another irregular and pin the cell down, preventing any further firing from the Irregular unit.
Aggrevated by his enemies success, the Taliban player (me) attempts to draw in another regular cell to fix the problem, but they outright refuse to listen to the leader that detached himself from the team earlier. Down to two dice, the Taliban leaders try to radio a team further behind the frontline, without success. Four command dice wasted without much effect!
With their single command dice, the Americans activate another fireteam in the back, firing on the unit in the field to keep it suppressed and then disengaging to support the attack on the right flank. Usually I would have started a close assault on the unit in the field at that point, but the IED placed right in the middle of the road deterred me.
Turn 4
The Taliban sacrifice one of their command dice to unpin their large cell on the hillside and roll 3 successes with their remaining 5 dice. The Americans also score 3 successes, resulting in a draw. So the Taliban retain initiative from last turn.
The Local Taliban casualty (irregular) is found dead, the wounded man in the field is up on his feet again, probably thanks to smoking a lot of Opium before the battle started.
Reinforcement Roll is a 5, so no additional troops and next turn the level increases to 3.
The Taliban use their initiative by attacking the Fireteam on the wall with the group on the hill, which is devastating flanking fire. They execute the Fog of War Card just to make sure they go first and push some 8 FP dice into the American team, scoring 4 successes. The Americans are exposed (flanking fire) and do not benefit from the wall facing the other way. Their saving roll is merely a 6+
In a display of good fortune, they roll two 8, one 7 and only a single 3, suffering just a single casualty. They are pinned and fall back into the nearby field, but their return fire has the Talibs putting their heads down again.
Again, they try to activate the defiant team inside the Canal, but as before they refuse to obey. With only one die left and all units within command range either activated or pinned, the Talibs lose their last command die.
The US-Player (again me - nice thing about solo gaming xD) puts some ineffective fire down range by their MG team while maneuvering two teams along the left and right flank. Progress is still slow due to the dense terrain.
Turn 5
Taliban spend another command initiative die to unpin the unit on the hilltop and a second to unpin their team in the field. With 4D6 they score two successed and again keep the initiative against a bad USMC roll with two successes.
The casualty of the flanked US Fireteam is again just lightly wounded, this seems to be a lucky day for the Americans.
Reinforcement roll is another 5, which means no more manpower for the insurgents this turn, but better chances next turn.
The Taliban leader with the irregulars by the canal detaches himself to run towards the compound, trying to get back into command range to avoid further loss of command dice.
They shoot on the MG team and force it back into the underbrush, but without any casualties. More fire pours down from the hill, targeting the pinned Marines in the fields on the right side of the road, but to no effect.
The US Teams now use their two command dice to move up two teams on the left and right flank.
Turn 6
Both teams are out of luck with their iniative rolls, only one success per side. The Taliban had spent another two dice to unpin their teams on the front line.
Reinforcement roll is a 4, which actually means reinforcements are arriving! The Taliban roll a 9 on their table, so 2D3 Ak + Leader + RPG. They roll 3xAk, so the team is five man strong again. The troops arrive at Hotspot number 1 - which is on top of the hill, where a huge blob of Insurgents now resides. America should have brought heavy calibres... I knew that taking the GPMG team to battle was a mistake, should have chosen the mortar salvos...
The large Taliban cell tries to keep up fire on the MG team, but again roll a 1 on their reaction - another Fog of War Card! "Playing Dead" - One unit that has been fired upon this turn may automatically go into hiding and has to be spotted again. Nice opportunities for some ambushes, maybe.
The US MG fire (still pinned and with reduced accuracy) is remarkably effective, taking two Talibs down - including the RPG gunner - and pinning the unit, preventing any effective return fire from these badly trained troops.
The Marines push on the right flank, closing with the Canal and trying to eradicate the last Irregular insurgent on the other side of the obstacle. With poor shooting on both sides, nothing happens.
Turn 7
Finally some good dice on the American command roll. 3 Successes. Unfortunately the Taliban now have another leader on the table, which takes them to 8 base initiative dice. Though they spent one to unpin a unit, they still roll the required three dice to keep the initiative.
First Aid on the Taliban at the hill (if you want to call it that way) looks grim, both are dead or dying. Nobody is trained to take over the RPG, so it´s left in the dust.
Reinforcement roll is a 3, which means MOAR TROOPS - Again it´s a 9 on the table, just as before. This time it´s 4xAK + Leader + RPG arriving at Hotspot number 3, on the far right corner of the board.
The reinforcements from last turn suffer badly when they try to engage a USMC fireteam. Two casualties including the leader and a demoralized unit are the result of the feeble attempt.
The cell in the field attempts to finish what the others failed to bring to a conclusion, but are interrupted by another US Fireteam. Losing both reaction tests, they are subject to the combined fire of two teams and are remarkably resilient, suffering just a single casualty and no morale effects, while dishing out a pinned result to one of the US teams.
Knowing it won´t get easier with time passing, the US forces are ordered onto the offensive. The right flank advances further towards the Canal with a second fireteam joining the push, the team on the left relocates to the edge of the woods to open fire on the Taliban on the hilltop.
Turn 8
Taliban Initiative suffers from the two dead leaders, but they still score 3 successes consistently and outmatch the Americans with two successes.
No Reinforcements this turn, but next turn the level is back to three. The Taliban leaders are beyond rescue and now the left flank could start to crumble. Fortunately, the Americans have to relocate their command elements to keep pushing forward.
The Taliban use out of contact movement to draw their reserve cell closer to the action and bring a leader back into command range of the units on the hill. They activate one of those to shoot on more Americans in the open, but are again preempted and devasted - the same unit as before. Losing three men and getting suppressed, the party is probably over for them.
At the Canal, the Taliban reinforcements are moving into close firefighting range with the Americans to prevent any further advances onto the objective. With both teams rolling a 1, it´s Fog of War Time again! The Taliban draw a free reroll of their reaction test (which they have won anyway, having the initiative), while the Americans hit the Jackpot: "Just a fleshwound" - The next serious wound is automatically downgraded to a light wound.
This seriously hampers the Taliban who need the serious wounds desperately!
The firefight erupts, after a few seconds an American is hit and his companions are heading for cover behind them. Their return fire hits a single Talib, but no on of importance.
The US player suppresses the Taliban on the hill with more fire from the Machinegun and the nearby infantry team before starting a mad dash across the open field, in a gamble to increase pressure on the enemy.
Turn 9
Finally scoring more successes than the Taliban, the US Marines achieve initiative for the turn (3 successes vs. 2) and the gamble might pay off.
All Taliban casualties from last turn are dead, the wounded US Marine has rolled a critical wound, but is downgraded to light thanks to the Fog of War Card.
Reinforcements do appear to bring the Taliban back on track (2 rolled) - 1D6+2 Insurgents with AK. A total of 5, again reinforcing hotspot 1 on the hill.
The Americans open fire on the cell in the field, suppressing them and whittling down their strength to two men. Setting their team on the far left on Overwatch to cover the hill, they attempt to initiate close assault...
Rolling a 7 the Americans charge forward, quickly dispatching the Taliban with grenades and controlled bursts.
The Taliban by the Canal turn to confront the Americans inside the field, but the short range firefight has them suppressed and suffering a casualty.
Turn 10
In a rare occurance, both teams roll all their dice successfully, producing 4 vs. 4 dice. The Taliban are suffering from the loss of their leaders...
Reinforcements are not in sight.
The US Marines on the left act on their own initiative and shoot at the large team on the hill - however, the Taliban draws a lucky Fog of War Card that auto-wins the reaction test for him, going first. With 8 FP rolling downhill, the Marines suffer a casualty and are utterly suppressed.
So the US retaliates in true fashion by bringing down more firepower and killing another Taliban, pinning the rest.
Inside the fields, the US Marines refuse to push deeper into the unknown to close assault the other cell, fearing an ambush. The Taliban are meanwhile attempting to outmaneuver them by bringing units around their left flank in the fields and along the hill. Fortunately they are able to spot the threat in time, silence the immediate threat and reposition to face further calamities.
At the end of Turn 10, the Objective is still contested, American forces have been lucky and their casualties light. So far, the scenario seems to be very balanced, which is good news for the scenario balancer. I´ll take a break here and get back to the game later - maybe with some human opposition?
Sunday, June 9, 2013
Marines and Insurgents
And from another perspective and with different lighting:
I also finished the first two insurgents, with more almost done but still waiting for some minor steps - most of the first batch of insurgents are conversions from the Caeser Urban Resisters pack, but most converted stuff was head- & torsoswaps or tweaks and modifications to the weaponry.
Nothing presentable on the sculpting front, but the German Grenadier is slowly taking shape.
I still owe you a battlereport from our Campaign, but I´m still not motivated to write it.
I should stop promising and anouncing stuff... ;)
Anyway, sooner or later I will finish the other insurgent conversions and add Specialists to my USMC-Squad. Painting my vehicles proper is also on the list.
Friday, February 1, 2013
DM/Sniper Update and finished Marines
Some new footage on the Marine Sniper type. Added his bodyarmour/webbing and the pouches today. Rifle is still not fixed (the magazine has to become slimmer - this might be causing some trouble due to the shape of the wire armature built into the weapon...)
As you can see, he still needs proper work on the lower body parts.
Right now, it seems to me like I´ll have to lengthen his legs somewhat to retain the right proportions. But first things first. As you can see below, the body armour is not perfect, but there is only so much working time and it´s the best result I achieved after numerous attempts.
Apart from that, nothing new. A, wait, there is! I finished the Marines.
BTW...
I´ll have to do something about those walls... while their shape is nice, the color is awful for the material... Might be right for a brick-building or something like that, but not a stone & mud wall.
Anyway, hope you enjoy!
As you can see, he still needs proper work on the lower body parts.
Right now, it seems to me like I´ll have to lengthen his legs somewhat to retain the right proportions. But first things first. As you can see below, the body armour is not perfect, but there is only so much working time and it´s the best result I achieved after numerous attempts.
Apart from that, nothing new. A, wait, there is! I finished the Marines.
BTW...
I´ll have to do something about those walls... while their shape is nice, the color is awful for the material... Might be right for a brick-building or something like that, but not a stone & mud wall.
Anyway, hope you enjoy!
Wednesday, January 23, 2013
US Marine Corps - WIP
Hey guys,
Its time again for a brief update. After the weekend passed by rather quickly due to our gaming day on saturday and a birthday party, I´m back to painting again. Originally, I´d planned to post a report here about our game on saturday, but unfortunately I´ve not been able to take any pictures. Though I packed the camera (and even checked if the batteries where charged), I forgot my SD-card - and my cameras internal drive is not even remotely large enough to store enough pics to give you a detailed report.
That´s a little unfortunate, especially because I´ve set up a historical scenario based on real events in Daulatabad, Farah Province from June 2008 [Vignette 6, starting at page 38] (This document is excellent by the way - indispensible for anyone interested in the Afghanistan conflict!). And it played out pretty well. The Americans fared significantly better than in reality (originally, they where lured into the fields and ambushed from both sides with minimum cover, suffering numerous casualties), managing to retreat from the ambush with only one serious casualty. However, the Taliban did not utilize their full potential, ambushing only with half their potential strength - otherwise, things might have turned out even worse for the Americans.
On monday, I tried to paint some of my Insurgents, but I´m not really happy with the results and stopped after the basic layer of color. Some of the colors are badly combined and don´t look good. Though I´ve taken numerous looks at Iraqi insurgent pics, I´m not able to replicate their fashion style on the minis just yet. Once I get back to them, I´ll take my laptop, place it next to the painting station and open google image search on iraqi insurgents, replicating specific insurgents instead of trying to wildly combine the appropriate colors... Maybe that works better.
Frustrated with that futile effort, I´ve turned onto the Marines:
They´re not yet 100% finished, but the uniform is complete. Maybe I´ll add some more coyote brown splotches to imitate the camo pattern, but I think they already look okay (the photo didn´t turn out very well, under real conditions the uniform doesn´t look that evenly colored). They just need some more detailwork on things like faces, gear and weapons and they´re done. I´ll post more pics when they´re finished!
Another sidenote on a small change I´ve made:
I´ve turned off moderation on comments for all recent posts. You can now freely comment on the articles without waiting for me to authorize the comment (for entries not older then 2 weeks). Maybe that increases your willingness to leave some comments :D
Its time again for a brief update. After the weekend passed by rather quickly due to our gaming day on saturday and a birthday party, I´m back to painting again. Originally, I´d planned to post a report here about our game on saturday, but unfortunately I´ve not been able to take any pictures. Though I packed the camera (and even checked if the batteries where charged), I forgot my SD-card - and my cameras internal drive is not even remotely large enough to store enough pics to give you a detailed report.
That´s a little unfortunate, especially because I´ve set up a historical scenario based on real events in Daulatabad, Farah Province from June 2008 [Vignette 6, starting at page 38] (This document is excellent by the way - indispensible for anyone interested in the Afghanistan conflict!). And it played out pretty well. The Americans fared significantly better than in reality (originally, they where lured into the fields and ambushed from both sides with minimum cover, suffering numerous casualties), managing to retreat from the ambush with only one serious casualty. However, the Taliban did not utilize their full potential, ambushing only with half their potential strength - otherwise, things might have turned out even worse for the Americans.
On monday, I tried to paint some of my Insurgents, but I´m not really happy with the results and stopped after the basic layer of color. Some of the colors are badly combined and don´t look good. Though I´ve taken numerous looks at Iraqi insurgent pics, I´m not able to replicate their fashion style on the minis just yet. Once I get back to them, I´ll take my laptop, place it next to the painting station and open google image search on iraqi insurgents, replicating specific insurgents instead of trying to wildly combine the appropriate colors... Maybe that works better.
Frustrated with that futile effort, I´ve turned onto the Marines:
| Marine Fireteam - Work in Progress |
Another sidenote on a small change I´ve made:
I´ve turned off moderation on comments for all recent posts. You can now freely comment on the articles without waiting for me to authorize the comment (for entries not older then 2 weeks). Maybe that increases your willingness to leave some comments :D
Sunday, January 13, 2013
Sculpting - Part IV: The ANGLICO again!
I´ve continued sculting a bit over the weekend, mostly on the Anglico and the Weaponry. The Insurgent Leader is almost completed, only his second hand holding the AK is still missing.
Meanwhile, I´ve continued working on the lone marine calling in fire support missions. He got his knee protectors today, as well as the Binoculars / Laser Designator:
Remember the sketch? We´re moving towards that goal:
He needs some finetuning and his helmet, but is moving ever closer towards completion.
Maybe I shouldn´t have added the knee protectors, but I felt like doing it...
As you can see, I´ve also obtained some railroad trees to enhance my terrain further. Wasn´t intended, but I couldn´t resist while walking through the store and I´m happy with the purchase. Mounted them on cardboard to have a better base. Those will get sanded & grassed later.
And another smallish project I started today with some surplus clay:
Casualty dollies!
Stay tuned for the next results, the Leader and the Anglico will soon be completed.
Meanwhile, I´ve continued working on the lone marine calling in fire support missions. He got his knee protectors today, as well as the Binoculars / Laser Designator:
Remember the sketch? We´re moving towards that goal:
He needs some finetuning and his helmet, but is moving ever closer towards completion.
Maybe I shouldn´t have added the knee protectors, but I felt like doing it...
As you can see, I´ve also obtained some railroad trees to enhance my terrain further. Wasn´t intended, but I couldn´t resist while walking through the store and I´m happy with the purchase. Mounted them on cardboard to have a better base. Those will get sanded & grassed later.
And another smallish project I started today with some surplus clay:
Casualty dollies!
Stay tuned for the next results, the Leader and the Anglico will soon be completed.
Friday, January 11, 2013
Sculpting Part 3 - ANGLICO progress
Another, smaller session of sculpting today. This time, I focused a little on the Marine ANGLICO and tried to build a better AK for my Insurgent leader (the pointing guy) with the new method I applied to the M16 from last post. Both weapons (my M16 and the newly crafted AK) might still be a bit too long.
In ~1/72 scale, the M16 should be 1,38cm long (a little more than 1/2"), while the AK should be approx. 1,2-3 cm long (depends on the variant). Both model-weapons are around 1,7cm long. Unfortunately, they look quite good as they are and I don´t know if I can shorten them without the risk of destroying them. If everything fails, I´ll have to make a new one with correct length. ;)
Anyway, enough talking. The Anglico:
Added some pouches, the backpack and the bit of protection kit between is legs. I´m still not 100% satisfied with the look of the groin protection. I´ll probably adjust it somewhat later, but I want to do the rest of the mini first, maybe it doesn´t look that bad when the rest of the fleshing-out is done.
The next step is to complete the legs & arms before moving on to the helmet and the binoculars.
In ~1/72 scale, the M16 should be 1,38cm long (a little more than 1/2"), while the AK should be approx. 1,2-3 cm long (depends on the variant). Both model-weapons are around 1,7cm long. Unfortunately, they look quite good as they are and I don´t know if I can shorten them without the risk of destroying them. If everything fails, I´ll have to make a new one with correct length. ;)
Anyway, enough talking. The Anglico:
Added some pouches, the backpack and the bit of protection kit between is legs. I´m still not 100% satisfied with the look of the groin protection. I´ll probably adjust it somewhat later, but I want to do the rest of the mini first, maybe it doesn´t look that bad when the rest of the fleshing-out is done.
The next step is to complete the legs & arms before moving on to the helmet and the binoculars.
Subscribe to:
Posts (Atom)